×
- Hello
- Login or Register
- Quick Links
- Live Chat
- Track Order
- Parts Availability
- RMA
- Help Center
- Contact Us
- Shop for
- Mercedes-Benz Parts
My Garage
My Account
Cart
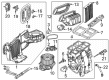
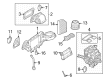
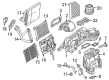
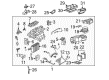
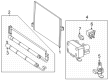
Genuine Mercedes-Benz A/C Accumulator
Accumulator- Select Vehicle by Model
- Select Vehicle by VIN
Select Vehicle by Model
orMake
Model
Year
Select Vehicle by VIN
For the most accurate results, select vehicle by your VIN (Vehicle Identification Number).
37 A/C Accumulators found

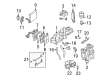
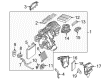
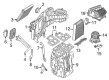
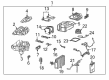
Mercedes-Benz Dehydrator Part Number: 177-830-90-01-64
$63.60 MSRP: $89.00You Save: $25.40 (29%)Ships in 1-2 Business DaysProduct Specifications- Other Name: Refrigerant Collector; Drier
- Replaces: 177-830-90-01

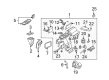
Mercedes-Benz Drier Dessicant Bag Part Number: 099-835-01-00-64
$73.20 MSRP: $102.00You Save: $28.80 (29%)Ships in 1-2 Business DaysProduct Specifications- Other Name: Refrigerant Drier; Dehydrator
- Replaces: 099-835-01-00

Mercedes-Benz Drier Dessicant Bag Part Number: 099-835-02-00-64
$88.80 MSRP: $124.00You Save: $35.20 (29%)Ships in 1-2 Business DaysProduct Specifications- Other Name: Refrigerant Drier; Dehydrator
- Replaces: 099-835-02-00

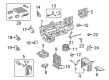
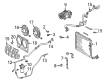
Mercedes-Benz Dehydrator Part Number: 203-835-01-47
$116.40 MSRP: $171.00You Save: $54.60 (32%)Ships in 1-2 Business DaysProduct Specifications- Other Name: Drier

Mercedes-Benz Dehydrator Part Number: 099-835-03-00-64
$106.68 MSRP: $149.00You Save: $42.32 (29%)Ships in 1-2 Business DaysProduct Specifications- Other Name: Refrigerant Drier; Drier
- Replaces: 099-835-03-00

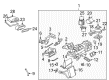
Mercedes-Benz Dehydrator Part Number: 197-834-00-68
$147.60 MSRP: $206.00You Save: $58.40 (29%)Ships in 1-2 Business DaysProduct Specifications- Other Name: Refrigerant Drier F AC; Drier, Receiver
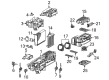
Mercedes-Benz Dehydrator Part Number: 204-835-01-47-64
$152.40 MSRP: $212.00You Save: $59.60 (29%)Ships in 1-2 Business DaysProduct Specifications- Other Name: Refrigerant Drier F AC; Drier, Receiver
- Replaces: 204-835-01-47

Mercedes-Benz Dehydrator Part Number: 170-830-00-83
$151.20 MSRP: $210.00You Save: $58.80 (28%)Ships in 1-2 Business DaysProduct Specifications- Other Name: Tank; Drier

Mercedes-Benz Dehydrator Part Number: 099-835-00-47-64
$162.00 MSRP: $226.00You Save: $64.00 (29%)Ships in 1-2 Business DaysProduct Specifications- Other Name: Refrigerant Drier; Drier
- Replaces: 099-835-00-47

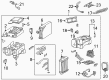
Mercedes-Benz Dehydrator Part Number: 176-835-00-00
$165.60 MSRP: $230.00You Save: $64.40 (28%)Ships in 1-2 Business DaysProduct Specifications- Other Name: Refrigerant Drier; Drier


Mercedes-Benz Dehydrator Part Number: 220-830-00-83
$159.70 MSRP: $222.00You Save: $62.30 (29%)Ships in 1-2 Business DaysProduct Specifications- Other Name: Tank; Drier

Mercedes-Benz Dehydrator Part Number: 251-835-00-47
$202.80 MSRP: $282.00You Save: $79.20 (29%)Ships in 1-2 Business DaysProduct Specifications- Other Name: Drier

Mercedes-Benz Dehydrator Part Number: 163-830-00-83-64
$213.60 MSRP: $298.00You Save: $84.40 (29%)Ships in 1-2 Business DaysProduct Specifications- Other Name: Container; Drier
- Replaces: 163-830-00-83

Mercedes-Benz Dehydrator Part Number: 211-835-02-47
$204.00 MSRP: $300.00You Save: $96.00 (32%)Ships in 1-2 Business DaysProduct Specifications- Other Name: Drier
Mercedes-Benz Dehydrator Part Number: 170-830-03-83
$217.20 MSRP: $302.00You Save: $84.80 (29%)Ships in 1-2 Business DaysProduct Specifications- Other Name: Dashpot; Drier
Mercedes-Benz Dehydrator Part Number: 211-835-00-47
$247.20 MSRP: $344.00You Save: $96.80 (29%)Ships in 1-2 Business DaysProduct Specifications- Other Name: Drier
- Replaces: 211-835-00-47-64

Mercedes-Benz Dehydrator Part Number: 221-830-02-83
$277.20 MSRP: $386.00You Save: $108.80 (29%)Ships in 1-2 Business DaysProduct Specifications- Other Name: Dashpot; Drier
- Replaces: 221-830-02-83-05

Mercedes-Benz Dehydrator Part Number: 202-830-00-83
Product Specifications- Other Name: Tank, A/C; Drier

Mercedes-Benz Dehydrator Part Number: 210-830-04-83
Product Specifications- Other Name: Tank; Drier
- Replaces: 210-830-02-83

Mercedes-Benz Dehydrator Part Number: 202-830-02-83
Product Specifications- Other Name: Tank; Drier
| Page 1 of 2 |Next >
1-20 of 37 Results
Mercedes-Benz A/C Accumulator
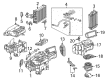
Mercedes-Benz A/C Accumulator protects the air conditioning system loop by filtering out moisture and debris, storing excess refrigerant, and ensuring that only vapor enters the compressor to provide passengers with constant, refreshing airflow even on the hot day. Positioned in the low pressure line, this cylinder contains a desiccant bag to absorb water which prevents corrosion, while its internal baffles collect metal particles that may otherwise grind the pump. By storing excess liquid until it turns into gas, the A/C Accumulator also prevents hydraulic lock, which adds to the life of the compressor and saves fuel efficiency that is important on every drive. Beyond this important component, Mercedes-Benz has established a global reputation for combining timeless style with cutting edge technology. The company's roots lie in 1926, but it continues to lead with innovations such as MBUX voice navigation, energy recovery systems in hybrid and electric models and the new MB.OS software platform which brings together driver assist, infotainment, and artificial intelligence. Drivers appreciate the brand for elegant interiors, robust safety engineering and innovations that make travel intuitive and connected. Whether you drive a compact sedan, a luxury SUV or a zero-emission flagship, each car is the result of a consistent commitment to comfort, performance, and advanced digital features, and it is easy to see why the three-pointed star continues to be a symbol of automotive excellence.
Genuine parts are built to last. These components go through tough factory testing, so you can trust they will hold up over time. At MBPartsGiant.com, finding Mercedes-Benz A/C Accumulator is quick and simple. We keep a massive inventory in stock with low prices that are hard to beat. Just order online to get a real manufacturer's warranty with every single part. Returns won't be a headache either, thanks to our no-hassle policy. If you are in a rush, we provide expedited shipping to get your vehicle back on the road. Don't wait. Finish your repairs today and keep your Mercedes-Benz running like new. Explore the catalog now.
Mercedes-Benz A/C Accumulator Parts and Q&A
- Q: How to the remove and install of the A/C Accumulator in an air conditioning system on Mercedes-Benz C230?A:The A/C accumulator is essential for storing refrigerant and removing moisture from the air conditioning system, and it must be replaced whenever a major component like the compressor, condenser, or evaporator is changed, or if the system has been exposed to air for an extended period. For vehicles manufactured up to April 23, 2004, the A/C accumulator is integrated into the right side of the condenser, while later models have it mounted beneath the front. To begin the removal process, take the vehicle to a service department to discharge and recover the refrigerant. For early models, open the hood, remove the plastic cover, unscrew the plug, and lift the A/C accumulator out. For later models, set the parking brake, block the rear wheels, raise the front securely, and remove the splash cover. Then, detach the clips holding the cover, unbolt the retaining plate, remove the mounting bolts, and separate the A/C accumulator from the refrigerant lines, capping or plugging the open lines immediately before taking it out of the vehicle. When installing a new A/C accumulator, add 20 cc of clean refrigerant oil to maintain the correct oil level. For early models, do not open the new A/C accumulator's packaging until ready for installation, and once opened, install it within 20 minutes, inserting it into the condenser with the cylinder end down and tightening the threaded plug. For later models, position the new A/C accumulator, lightly tighten the mounting bracket bolt to allow for alignment, lubricate the O-rings with clean refrigerant oil, reconnect the lines, and securely tighten the mounting bracket bolt before installing the cover and splash cover. Finally, have the system evacuated, recharged, and leak tested by a professional.

Related Mercedes-Benz Parts
 Mercedes-Benz Brake Caliper
 Mercedes-Benz Blower Motor Resistor
 Mercedes-Benz Harmonic Balancer
 Mercedes-Benz A/C Expansion Valve
 Mercedes-Benz A/C Switch
 Mercedes-Benz Car Bulbs
 Mercedes-Benz Coolant Temperature Sensors
 Mercedes-Benz Differential Seal
 Mercedes-Benz Driveshaft
 Mercedes-Benz Power Seat Switch
 Mercedes-Benz Timing Cover Gasket
 Mercedes-Benz Transfer Case Gasket
Browse by Model
190D A/C Accumulator 190E A/C Accumulator 260E A/C Accumulator 300CD A/C Accumulator 300CE A/C Accumulator 300D A/C Accumulator 300E A/C Accumulator 300SD A/C Accumulator 300SDL A/C Accumulator 300SE A/C Accumulator 300SEL A/C Accumulator 300SL A/C Accumulator 300TD A/C Accumulator 300TE A/C Accumulator 350SD A/C Accumulator 350SDL A/C Accumulator 380SE A/C Accumulator 380SL A/C Accumulator 400E A/C Accumulator 400SE A/C Accumulator 400SEL A/C Accumulator 420SEL A/C Accumulator 500E A/C Accumulator 500SEC A/C Accumulator 500SEL A/C Accumulator 500SL A/C Accumulator 560SEC A/C Accumulator 560SEL A/C Accumulator 560SL A/C Accumulator 600SEC A/C Accumulator 600SEL A/C Accumulator 600SL A/C Accumulator C220 A/C Accumulator C230 A/C Accumulator C240 A/C Accumulator C250 A/C Accumulator C280 A/C Accumulator C300 A/C Accumulator C32 AMG A/C Accumulator C320 A/C Accumulator C350 A/C Accumulator C43 AMG A/C Accumulator C55 AMG A/C Accumulator C63 AMG A/C Accumulator CL500 A/C Accumulator CL55 AMG A/C Accumulator CL550 A/C Accumulator CL600 A/C Accumulator CL63 AMG A/C Accumulator CL65 AMG A/C Accumulator CLA250 A/C Accumulator CLA45 AMG A/C Accumulator CLK320 A/C Accumulator CLK350 A/C Accumulator CLK430 A/C Accumulator CLK500 A/C Accumulator CLK55 AMG A/C Accumulator CLK63 AMG A/C Accumulator CLS400 A/C Accumulator CLS500 A/C Accumulator CLS55 AMG A/C Accumulator CLS550 A/C Accumulator CLS63 AMG A/C Accumulator CLS63 AMG S A/C Accumulator E250 A/C Accumulator E300 A/C Accumulator E320 A/C Accumulator E350 A/C Accumulator E400 A/C Accumulator E420 A/C Accumulator E430 A/C Accumulator E500 A/C Accumulator E55 AMG A/C Accumulator E550 A/C Accumulator E63 AMG A/C Accumulator E63 AMG S A/C Accumulator EQE 350 A/C Accumulator EQE 350 SUV A/C Accumulator EQE 350+ A/C Accumulator EQE 350+ SUV A/C Accumulator EQE 500 A/C Accumulator EQE 500 SUV A/C Accumulator EQE AMG A/C Accumulator EQS 450 A/C Accumulator EQS 450 SUV A/C Accumulator EQS 450+ A/C Accumulator EQS 450+ SUV A/C Accumulator EQS 580 A/C Accumulator EQS 580 SUV A/C Accumulator EQS AMG A/C Accumulator G500 A/C Accumulator G55 AMG A/C Accumulator G550 A/C Accumulator G63 AMG A/C Accumulator G65 AMG A/C Accumulator GL320 A/C Accumulator GL350 A/C Accumulator GL450 A/C Accumulator GL550 A/C Accumulator GL63 AMG A/C Accumulator GLA45 AMG A/C Accumulator GLC300 A/C Accumulator GLE300d A/C Accumulator GLE350 A/C Accumulator GLE400 A/C Accumulator GLE43 AMG A/C Accumulator GLE450 A/C Accumulator GLE450 AMG A/C Accumulator GLE53 AMG A/C Accumulator GLE550e A/C Accumulator GLE580 A/C Accumulator GLE63 AMG A/C Accumulator GLE63 AMG S A/C Accumulator GLK250 A/C Accumulator GLK350 A/C Accumulator GLS350d A/C Accumulator GLS450 A/C Accumulator GLS550 A/C Accumulator GLS580 A/C Accumulator GLS63 AMG A/C Accumulator ML250 A/C Accumulator ML320 A/C Accumulator ML350 A/C Accumulator ML400 A/C Accumulator ML430 A/C Accumulator ML450 A/C Accumulator ML500 A/C Accumulator ML55 AMG A/C Accumulator ML550 A/C Accumulator ML63 AMG A/C Accumulator R320 A/C Accumulator R350 A/C Accumulator R500 A/C Accumulator R63 AMG A/C Accumulator S320 A/C Accumulator S350 A/C Accumulator S400 A/C Accumulator S420 A/C Accumulator S430 A/C Accumulator S500 A/C Accumulator S55 AMG A/C Accumulator S550 A/C Accumulator S580 A/C Accumulator S580e A/C Accumulator S600 A/C Accumulator S63 AMG A/C Accumulator S65 AMG A/C Accumulator SL320 A/C Accumulator SL400 A/C Accumulator SL450 A/C Accumulator SL500 A/C Accumulator SL55 AMG A/C Accumulator SL550 A/C Accumulator SL600 A/C Accumulator SL63 AMG A/C Accumulator SL65 AMG A/C Accumulator SLC300 A/C Accumulator SLC43 AMG A/C Accumulator SLK230 A/C Accumulator SLK250 A/C Accumulator SLK280 A/C Accumulator SLK300 A/C Accumulator SLK32 AMG A/C Accumulator SLK320 A/C Accumulator SLK350 A/C Accumulator SLK55 AMG A/C Accumulator