×
- Hello
- Login or Register
- Quick Links
- Live Chat
- Track Order
- Parts Availability
- RMA
- Help Center
- Contact Us
- Shop for
- Mercedes-Benz Parts
My Garage
My Account
Cart
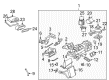
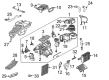
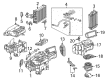
Genuine Mercedes-Benz C280 Heater Core
HVAC Heater Core- Select Vehicle by Model
- Select Vehicle by VIN
Select Vehicle by Model
orMake
Model
Year
Select Vehicle by VIN
For the most accurate results, select vehicle by your VIN (Vehicle Identification Number).
3 Heater Cores found

Mercedes-Benz C280 Heater Core Part Number: 210-830-06-61
$158.40 MSRP: $220.00You Save: $61.60 (28%)Ships in 1-2 Business Days
Mercedes-Benz C280 Heater Core Part Number: 203-830-01-61
$138.00 MSRP: $192.00You Save: $54.00 (29%)Ships in 1-2 Business Days
Mercedes-Benz C280 Heater Core Part Number: 202-830-04-61
Mercedes-Benz C280 Heater Core
Every OEM part goes through strict quality checks. The checks keep you safe and make Heater Core tough. They keep performance the same as your original parts. If your Mercedes-Benz C280 needs OEM parts, visit our catalog. You will find extensive genuine Mercedes-Benz C280 parts. We offer a wide selection at competitive prices, and with clear fit details and simple guidance, choosing what you need is effortless. Each of our parts has a manufacturer's warranty. You will like our simple return policy. We pack and ship fast, and you get your order quickly. Shopping here feels easy and enjoyable.
Mercedes-Benz C280 Heater Core Parts and Q&A
- Q: Is the replacement of the heater core a difficult procedure for the home mechanic on Mercedes-Benz C280?A:Replacement of the heater core is a challenging task for home mechanics, so it's important to keep track of assemblies by taking notes and storing screws and other hardware in small, labeled plastic bags for reassembly. Begin by turning the heater control setting to HOT and draining the cooling system, saving the coolant if it is relatively new or in good condition. Disconnect the cable from the negative terminal of the battery, then adjust the steering column as far back and down as possible before removing the steering wheel. Next, remove the lower trim panel from the left side of the instrument panel, followed by the instrument cluster and the accelerator pedal. Peel back the carpet in the driver's footwell to expose the air duct leading to the back seat, then detach the steering column from the instrument panel and lower it into the footwell without separating the steering shaft from the coupling. Unhook the three springs securing the upper end of the rear air duct and remove the fitting at the upper end of the duct. Place plastic sheeting on the footwell floor, then pull the clips out of the heater hose fittings and unbolt the bracket to remove the heater core. Carefully pull the coolant tubes out of the heater core, remove the bracket bolts, and take the bracket off the heater core, separating it from the evaporator housing. Wipe any spilled coolant from the inside of the housing, and during installation, follow the reverse order of removal, ensuring to tighten the nuts or bolts to the specified torque when attaching the steering column to the support bracket. Finally, refill the cooling system, reconnect the battery, and run the engine to check for leaks and proper operation of the system.

Related Mercedes-Benz C280 Parts
 Mercedes-Benz C280 Automatic Transmission Shift Indicator
 Mercedes-Benz C280 Brake Dust Shield
 Mercedes-Benz C280 Coil Spring Insulator
 Mercedes-Benz C280 Coil Springs
 Mercedes-Benz C280 CV Joint Boot
 Mercedes-Benz C280 Door Lock
 Mercedes-Benz C280 Fuel Pressure Regulator
 Mercedes-Benz C280 Oxygen Sensor
 Mercedes-Benz C280 Steering Knuckle
 Mercedes-Benz C280 Washer Reservoir Cap
 Mercedes-Benz C280 Wheel Hub
 Mercedes-Benz C280 Wheel Seal