×
- Hello
- Login or Register
- Quick Links
- Live Chat
- Track Order
- Parts Availability
- RMA
- Help Center
- Contact Us
- Shop for
- Mercedes-Benz Parts
My Garage
My Account
Cart
Genuine Mercedes-Benz C320 Sway Bar
Sway Bar Kit- Select Vehicle by Model
- Select Vehicle by VIN
Select Vehicle by Model
orMake
Model
Year
Select Vehicle by VIN
For the most accurate results, select vehicle by your VIN (Vehicle Identification Number).
8 Sway Bars found

Mercedes-Benz C320 Stabilizer Bar Part Number: 203-323-43-65
$75.60 MSRP: $105.00You Save: $29.40 (28%)Ships in 1-2 Business Days
Mercedes-Benz C320 Stabilizer Bar Part Number: 203-323-44-65
$75.60 MSRP: $105.00You Save: $29.40 (28%)Ships in 1-2 Business Days
Mercedes-Benz C320 Stabilizer Bar Part Number: 203-323-42-65
$75.60 MSRP: $105.00You Save: $29.40 (28%)Ships in 1-2 Business Days
Mercedes-Benz C320 Stabilizer Bar Part Number: 203-323-46-65
$96.00 MSRP: $134.00You Save: $38.00 (29%)Ships in 1-2 Business Days
Mercedes-Benz C320 Stabilizer Bar Part Number: 203-326-12-65
$102.00 MSRP: $142.00You Save: $40.00 (29%)Ships in 1-2 Business Days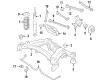
Mercedes-Benz C320 Stabilizer Bar Part Number: 203-326-14-65
$110.40 MSRP: $154.00You Save: $43.60 (29%)Ships in 1-2 Business DaysMercedes-Benz C320 Stabilizer Bar Part Number: 203-323-48-65
$96.00 MSRP: $134.00You Save: $38.00 (29%)Ships in 1-2 Business Days
Mercedes-Benz C320 Stabilizer Bar Part Number: 203-326-15-65
$130.80 MSRP: $182.00You Save: $51.20 (29%)Ships in 1-2 Business Days
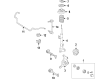
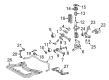
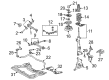
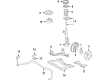
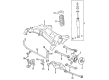
Mercedes-Benz C320 Sway Bar
Every OEM part goes through strict quality checks. The checks keep you safe and make Sway Bar tough. They keep performance the same as your original parts. If your Mercedes-Benz C320 needs OEM parts, visit our catalog. You will find extensive genuine Mercedes-Benz C320 parts. We offer a wide selection at competitive prices, and with clear fit details and simple guidance, choosing what you need is effortless. Each of our parts has a manufacturer's warranty. You will like our simple return policy. We pack and ship fast, and you get your order quickly. Shopping here feels easy and enjoyable.
Mercedes-Benz C320 Sway Bar Parts and Q&A
- Q: How to remove and inspect the front Sway Bar, Sway Bar Bushing and Sway Bar Link on Mercedes-Benz C320?A:Lift the front of the car and rest it low on jackstands, then take off the front wheels, but set the jackstands up against the frame and not on anything in the suspension. Take out a vehicle undercarriage splash screen. Then unscrew the lower nut in each stabilizer bar link and also all the links of the bar, checking the little boots to see whether they are damaged or worn, and replacing them, as needed; the links may be completely removed by parting them out of the strut assemblies. Remove the fasteners of the stabilizer bar bracket along with the bracket, taking care with models with bi-xenon headlamps that there is a sensor and linkage installed to the stabilizer bar; make a note of where the sensor linkage is before carefully removing it. Removing the stabilizer bar and the rubber bushings of the stabilizer bar of rear-wheel drive models. Removal of the stabilizer bar in 4MATIC floor processes necessitize lowering the sub frame but stabilising the engine weight at the top, making the work demanding in terms of procedures and safety measures; it is always recommended that when the vehicle is suspected to be damaged to be inspected at a qualified body repair business. Wipe down the entire stabilizer bar that touches the bushings and check all the bushings, replacing any broken, tainted, or damaged strands of rubber. Check every stabilizer link due to excessive wear, replace where required then re-fit in reverse order in which they were removed and make sure that all sources are tightened with the appropriate torque.

Related Mercedes-Benz C320 Parts
 Mercedes-Benz C320 A/C Compressor Cut-Out Switches
 Mercedes-Benz C320 Air Bag Sensor
 Mercedes-Benz C320 Coolant Pipe
 Mercedes-Benz C320 CV Joint
 Mercedes-Benz C320 Door Lock
 Mercedes-Benz C320 Fuel Pump Relay
 Mercedes-Benz C320 Fuel Sending Unit
 Mercedes-Benz C320 Harmonic Balancer
 Mercedes-Benz C320 Intake Manifold Gasket
 Mercedes-Benz C320 Oil Cooler Hose
 Mercedes-Benz C320 Secondary Air Injection Check Valve