×
- Hello
- Login or Register
- Quick Links
- Live Chat
- Track Order
- Parts Availability
- RMA
- Help Center
- Contact Us
- Shop for
- Mercedes-Benz Parts
My Garage
My Account
Cart
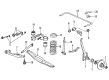
Genuine Mercedes-Benz 300TD Brake Hose
Brake Line- Select Vehicle by Model
- Select Vehicle by VIN
Select Vehicle by Model
orMake
Model
Year
Select Vehicle by VIN
For the most accurate results, select vehicle by your VIN (Vehicle Identification Number).
3 Brake Hoses found


Mercedes-Benz 300TD Brake Hose Part Number: 126-428-03-35-64
$19.52 MSRP: $27.00You Save: $7.48 (28%)Ships in 1-2 Business Days
Mercedes-Benz 300TD Brake Hose Part Number: 129-428-00-35-64
$39.60 MSRP: $55.00You Save: $15.40 (28%)Ships in 1-2 Business Days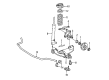
Mercedes-Benz 300TD Brake Hose Part Number: 123-428-02-35
$30.50 MSRP: $42.00You Save: $11.50 (28%)Ships in 1-2 Business Days
Mercedes-Benz 300TD Brake Hose
Every OEM part goes through strict quality checks. The checks keep you safe and make Brake Hose tough. They keep performance the same as your original parts. If your Mercedes-Benz 300TD needs OEM parts, visit our catalog. You will find extensive genuine Mercedes-Benz 300TD parts. We offer a wide selection at competitive prices, and with clear fit details and simple guidance, choosing what you need is effortless. Each of our parts has a manufacturer's warranty. You will like our simple return policy. We pack and ship fast, and you get your order quickly. Shopping here feels easy and enjoyable.
Mercedes-Benz 300TD Brake Hose Parts and Q&A
- Q: How should front and rear Brake Hose flexible hoses and steel brake lines be inspected and replaced on Mercedes-Benz 300TD?A:After about six months, and the vehicle should be up in the air with the jackstands attached to it, the flexible hose connecting the steel brake lines to the front and rear brake assembling should be checked for cracks, chafing, leaks, blisters, and other damages since these are vital parts of the brake system. A light/mirror will assist in a good check up and in case something is wrong remove the hose by unscrewing at the point of the rigid line linkage and unscrewing it off the caliper, or connector, at the other end. The threads of all bolts and fluid line connections should be clean when installing them, thread on with fingers and not cross-threaded, and then tighten with a wrench. When installed, inspect hose kinks/twists and make sure that it does not rub against any areas of the suspension by rotating the wheels to an extreme left or right; if so, adjust the lock plate on the flexible hose bracket to relocate the hose. Fill master cylinder reservoir and bleed. It is preferred to use solely double wall steel tubing when substituting steel lines, as copper is prone to fatigue cracking and to corrosion, and use the outer diameter in sizing. Dealers providing direct replacement parts and auto parts stores provide a variety of different lengths of prefabricated brake line. When one cannot find the recommended steel tubing and fittings, get the best available tubing insults, make the correct length by measuring the old brake line, and cut the new tubing, leaving about 1/2-inch length extension to flare the ends. Fit the fittings to the tubing which has been cut off and flare the ends with an ISO flaring tool and then bend the tubing into the shape of the previous brake line with a tubing bender. Tube flaring and bending can be done locally where there are stores which sell auto parts. During installation of the brake line, clearance between line and any moving parts must be at least 3/4-inches.

Related Mercedes-Benz 300TD Parts
 Mercedes-Benz 300TD Drive Belt
 Mercedes-Benz 300TD Power Seat Gear
 Mercedes-Benz 300TD Power Seat Switch
 Mercedes-Benz 300TD Weather Strip