×
- Hello
- Login or Register
- Quick Links
- Live Chat
- Track Order
- Parts Availability
- RMA
- Help Center
- Contact Us
- Shop for
- Mercedes-Benz Parts
My Garage
My Account
Cart
Genuine Mercedes-Benz C280 CV Joint Boot
Constant-Velocity Joint Boot- Select Vehicle by Model
- Select Vehicle by VIN
Select Vehicle by Model
orMake
Model
Year
Select Vehicle by VIN
For the most accurate results, select vehicle by your VIN (Vehicle Identification Number).
4 CV Joint Boots found

Mercedes-Benz C280 Outer Boot Part Number: 210-357-01-91
$28.06 MSRP: $38.50You Save: $10.44 (28%)
Mercedes-Benz C280 Outer Boot Part Number: 124-357-01-91
$26.23 MSRP: $36.00You Save: $9.77 (28%)Ships in 1-2 Business Days
Mercedes-Benz C280 Inner Boot Part Number: 210-350-08-37
$12.20 MSRP: $17.00You Save: $4.80 (29%)Ships in 1-2 Business Days
Mercedes-Benz C280 Outer Boot Part Number: 220-330-01-85
$5.49 MSRP: $7.50You Save: $2.01 (27%)Ships in 1-2 Business Days
Mercedes-Benz C280 CV Joint Boot
Every OEM part goes through strict quality checks. The checks keep you safe and make CV Joint Boot tough. They keep performance the same as your original parts. If your Mercedes-Benz C280 needs OEM parts, visit our catalog. You will find extensive genuine Mercedes-Benz C280 parts. We offer a wide selection at competitive prices, and with clear fit details and simple guidance, choosing what you need is effortless. Each of our parts has a manufacturer's warranty. You will like our simple return policy. We pack and ship fast, and you get your order quickly. Shopping here feels easy and enjoyable.
Mercedes-Benz C280 CV Joint Boot Parts and Q&A
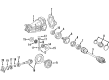
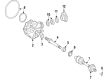
- Q: What should be considered before beginning the overhaul of CV Joint Boot on CV joints on Mercedes-Benz C280?A:If the CV joints show signs of wear, typically due to torn boots, consider all alternatives before starting the overhaul, as complete rebuilt driveaxles may be available on an exchange basis, saving time and effort. Begin by loosening the wheel bolts, raising the vehicle securely on jackstands, and removing the wheel. Next, mount the driveaxle in a bench vise with wood blocks for protection, ensuring not to overtighten. Remove the boot retaining clamps and slide the inner boot back, then wipe excess grease from the joint. Mark the positions of the bearing cage, inner race, and housing, then remove the ball bearings one at a time by tilting the cage. After all balls are removed, tap the inner race off the shaft, clean all parts with solvent, and inspect for damage or wear; if any components are unserviceable, replace the entire CV joint assembly. For assembly, wrap the splines with tape to protect the CV joint boot, install the boot and clamp, and tap the inner race back onto the shaft, ensuring alignment with the marks made earlier. Pack lubricant into the ball races, install the balls, fill the joint with grease, and position the boot correctly, adjusting the joint length and equalizing pressure inside the boot before tightening the clamps. For the outer CV joint, repeat the disassembly and assembly steps, ensuring to clean and inspect all parts thoroughly. Finally, for front driveaxles in AWD models, mount the driveaxle in a vise and follow the CV joint boot replacement procedure as illustrated.


