×
- Hello
- Login or Register
- Quick Links
- Live Chat
- Track Order
- Parts Availability
- RMA
- Help Center
- Contact Us
- Shop for
- Mercedes-Benz Parts
My Garage
My Account
Cart
Genuine 1993 Mercedes-Benz 190E CV Joint Boot
Constant-Velocity Joint Boot- Select Vehicle by Model
- Select Vehicle by VIN
Select Vehicle by Model
orMake
Model
Year
Select Vehicle by VIN
For the most accurate results, select vehicle by your VIN (Vehicle Identification Number).
1 CV Joint Boot found

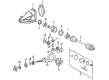
1993 Mercedes-Benz 190E CV Joint Boot Kit Part Number: 201-350-12-37
$2.22 MSRP: $3.10You Save: $0.88 (29%)Ships in 1-2 Business DaysProduct Specifications- Other Name: Repair-Kit; Boot, Inner Boot
- Replaced by: 201-357-03-75
- Condition: New
- Fitment Type: Direct Replacement
- SKU: 201-350-12-37
- Warranty: This genuine part is guaranteed by Mercedes-Benz's factory warranty.
1993 Mercedes-Benz 190E CV Joint Boot Parts Q&A
- Q: How to remove and replace a CV Joint Boot on a driveshaft and its constant velocity joints on 1993 Mercedes-Benz 190E?A: Unattach the driveshaft and clean it then screw it into a vice. Loosen the end of the sealing cover of the inner constant velocity joint with a lever, then cut the two inner joint CV joint boot retaining clips by sliding the boot along the driveshaft. Brush off excess grease and detach the inner joint circlip, and either knock or tap the inner joint off the end of the driveshaft and take care to hold the inner joint inner member firmly. Unmount the boot by sliding it over the driveshaft and dismount the clips holding the outer joint CV joint boot which attaches to the outer joint, sliding it the rest of the way down the shaft. Wipe out the constant velocity joints using a lot of paraffin or any other appropriate solvent and perform a surface ridge check inspection by rolling the inner, splined driving member to expose its balls, and checking them, one by one, on their exterior aspect. Check the wear on the ball tracks on the inner and outer members, and the windows to the ball cage. Worn or damaged parts need to be replaced; an inner joint may be segmented independently, but an outer joint which is worn needs to be replaced, the entire joint and drive shaft assembly should change. Provided that the joints are good to go, buy fresh boot repair kits. Be sure to keep the splines on the end of the drive shaft covered with a piece of tape and cover the new outer boot with it. Load the outer joint with the appropriate grease, pushing a fair portion of it into the tracks where it is required to sit and stuffing the remainder into the rubber boot. Check that the fitting of the boot lips is proper and that the outer sealing lip is raised to level pressure. Tighten the large metal retaining clip around the boot, cautiously shutting out all slackness, and fix the small retaining clip in the same way. Install the new inner joint boot on top of the driveshaft, take out the tape off the splines and install the inner constant velocity joint using a new circlip to hold it in place. Grease the inner joint provided with the grease supplied, and stuff the boot with any to spare of that, having the lips of the boot properly placed in position, and advanced with retaining clips. Clean and dry the inner joint mating surfaces and the dust cover outer mating surface, apply sealant to the outer edge of the dust cover, and press cover to maximum surface of the inner joint. Last but not least, make sure that before refitting the driveshaft both constant velocity joints move freely.
Related 1993 Mercedes-Benz 190E Parts
 1993 Mercedes-Benz 190E Fuse Box
 1993 Mercedes-Benz 190E Axle Shaft Seal
 1993 Mercedes-Benz 190E Distributor Rotor
 1993 Mercedes-Benz 190E Exhaust Manifold
 1993 Mercedes-Benz 190E Speedometer Cable
 1993 Mercedes-Benz 190E Windshield