×
- Hello
- Login or Register
- Quick Links
- Live Chat
- Track Order
- Parts Availability
- RMA
- Help Center
- Contact Us
- Shop for
- Mercedes-Benz Parts
My Garage
My Account
Cart
Genuine Mercedes-Benz 300TD Piston
Engine Pistons- Select Vehicle by Model
- Select Vehicle by VIN
Select Vehicle by Model
orMake
Model
Year
Select Vehicle by VIN
For the most accurate results, select vehicle by your VIN (Vehicle Identification Number).
1 Piston found

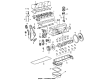
Mercedes-Benz 300TD Piston Part Number: 617-030-10-17
Mercedes-Benz 300TD Piston
Every OEM part goes through strict quality checks. The checks keep you safe and make Piston tough. They keep performance the same as your original parts. If your Mercedes-Benz 300TD needs OEM parts, visit our catalog. You will find extensive genuine Mercedes-Benz 300TD parts. We offer a wide selection at competitive prices, and with clear fit details and simple guidance, choosing what you need is effortless. Each of our parts has a manufacturer's warranty. You will like our simple return policy. We pack and ship fast, and you get your order quickly. Shopping here feels easy and enjoyable.
Mercedes-Benz 300TD Piston Parts and Q&A
- Q: How to properly remove piston and connecting rod assemblies on Mercedes-Benz 300TD?A:Before detaching the piston and connecting rod assemblies, the engine should be placed on its back and the upper edges of the cylinder bores examined with sharp ridge that is definitely felt or seen; if there is a only a slight ridge tough emery cloth may be applied. Wipe off the top of each cylinder with a ridge reamer, as directed by the manufacturer, to fully remove the ridge: otherwise the piston will fracture. Once all the wear ridges of the cylinder have been removed, invert the engine. Check the end play by holding to the dial indicator with stem along the crankshaft and in contact with the side of the one connecting rod cap before loosening the connecting rods. Adjust the dial indicator by pushing the connected rod backwards until the dial pointer is at the mark, then pressing it forward to a desirable location, the distance covered is the distance of the end play and when it hits the service limit the connecting rod will have to be taken off. A second way is with the feeler gauges between the connecting Rod and the crankshaft throw until play is eliminated. Clean out the cylinder block oil jets by rotating the crankshaft to align each piston with bottom dead center using an Allen wrench socket (limited access) and label the oil jets since they do not interchange. Check the connecting rods and caps with identification marks that they have it must be all plainly marked; otherwise make marks by the use of a small punch denoting by which groove they belong to the corresponding cylinder. Twist the connecting rod cap nut of each connecting rod some 1/2 turn, then take away the bearing insert and number one connector rod cap without falling out of it. To cushion the crankshaft journal and the cylinder wall, slide a short length of plastic or rubber hose over each connecting rod cap bolt then push the connecting rod/piston assembly, by pushing the top bearing insert, out the top of the engine. Should resistance occur, be sure you remove all ridge material inside the cylinder. Proceed to remove the other cylinders and re-assemble the connecting rod caps and bearing bears-inserts, in the same rods, taking care that the connecting rod-cap nuts are tapped with the fingers, so that they may not ruin accidentally one or other of the bearing surfaces.
Related Mercedes-Benz 300TD Parts
 Mercedes-Benz 300TD Air Filter Box
 Mercedes-Benz 300TD Power Steering Cooler
 Mercedes-Benz 300TD Power Steering Pump
 Mercedes-Benz 300TD Sway Bar Bushing
 Mercedes-Benz 300TD Windshield Wiper Motors