×
- Hello
- Login or Register
- Quick Links
- Live Chat
- Track Order
- Parts Availability
- RMA
- Help Center
- Contact Us
- Shop for
- Mercedes-Benz Parts
My Garage
My Account
Cart
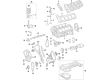
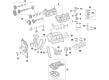
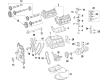
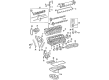
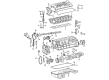
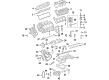
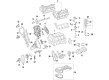
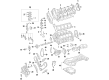
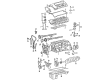
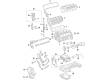
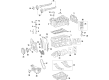
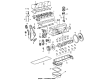
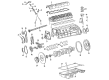
Genuine Mercedes-Benz Crankshaft Timing Gear
Crankshaft Sprocket- Select Vehicle by Model
- Select Vehicle by VIN
Select Vehicle by Model
orMake
Model
Year
Select Vehicle by VIN
For the most accurate results, select vehicle by your VIN (Vehicle Identification Number).
24 Crankshaft Timing Gears found

Mercedes-Benz Crankshaft Gear Part Number: 278-052-05-03
$74.40 MSRP: $104.00You Save: $29.60 (29%)Ships in 1-2 Business Days
Mercedes-Benz Crankshaft Gear Part Number: 642-050-09-03
$129.60 MSRP: $180.00You Save: $50.40 (28%)Ships in 1-2 Business DaysProduct Specifications- Replaced by: 642-050-09-03-64
Mercedes-Benz Crankshaft Gear Part Number: 642-050-10-03
$102.00 MSRP: $142.00You Save: $40.00 (29%)Ships in 1-2 Business DaysProduct Specifications- Replaced by: 642-050-10-03-64

Mercedes-Benz Crankshaft Gear Part Number: 275-050-00-03-64
$206.40 MSRP: $288.00You Save: $81.60 (29%)Ships in 1-2 Business DaysProduct Specifications- Replaces: 275-050-00-03, 137-052-01-03

Mercedes-Benz Crankshaft Gear Part Number: 646-050-02-03
$44.40 MSRP: $62.00You Save: $17.60 (29%)Ships in 1-2 Business DaysProduct Specifications- Replaced by: 646-050-02-03-64

Mercedes-Benz Crankshaft Gear Part Number: 155-050-00-03-64
$96.00 MSRP: $134.00You Save: $38.00 (29%)Ships in 1-2 Business DaysProduct Specifications- Other Name: Gear, Timing Gear Set
- Replaces: 155-050-00-03, 112-052-02-03, 112-052-03-03, 112-052-10-03

Mercedes-Benz Crankshaft Gear Part Number: 276-052-05-03
$252.00 MSRP: $350.00You Save: $98.00 (28%)Ships in 1-2 Business DaysProduct Specifications- Replaced by: 276-052-05-03-64


Mercedes-Benz Crankshaft Gear Part Number: 271-052-17-03-64
$271.20 MSRP: $378.00You Save: $106.80 (29%)Ships in 1-2 Business DaysProduct Specifications- Replaces: 271-052-06-03, 271-052-07-03, 271-052-17-03

Mercedes-Benz Vibration Damper Part Number: 278-052-01-03
$165.60 MSRP: $230.00You Save: $64.40 (28%)Ships in 1-2 Business DaysProduct Specifications- Other Name: Crankshaft Gear
Mercedes-Benz Crankshaft Gear Part Number: 276-052-01-03
$136.80 MSRP: $190.00You Save: $53.20 (28%)Ships in 1-2 Business Days

Mercedes-Benz Crankshaft Gear Part Number: 271-052-19-03
$236.40 MSRP: $330.00You Save: $93.60 (29%)Ships in 1-2 Business DaysProduct Specifications- Replaces: 271-052-12-03

Mercedes-Benz Crankshaft Gear Part Number: 272-050-00-03
$120.00 MSRP: $167.00You Save: $47.00 (29%)Ships in 1-2 Business DaysProduct Specifications- Other Name: Timing Gear Set
- Replaced by: 272-050-00-03-64
Mercedes-Benz Crankshaft Gear Part Number: 111-052-05-03
$241.20 MSRP: $336.00You Save: $94.80 (29%)Ships in 1-2 Business DaysProduct Specifications- Replaces: 111-052-02-03


Mercedes-Benz Crankshaft Gear Part Number: 642-050-08-03
$214.80 MSRP: $300.00You Save: $85.20 (29%)Ships in 1-2 Business DaysProduct Specifications- Replaced by: 642-050-08-03-64

Mercedes-Benz Crankshaft Gear Part Number: 156-050-01-03
$208.80 MSRP: $290.00You Save: $81.20 (28%)Ships in 1-2 Business DaysProduct Specifications- Replaces: 156-050-00-03
Mercedes-Benz Intermediate Gear Part Number: 156-050-11-05
$216.00 MSRP: $300.00You Save: $84.00 (28%)Ships in 1-2 Business DaysProduct Specifications- Other Name: Crankshaft Gear

Mercedes-Benz Crankshaft Gear Part Number: 264-052-00-00
$43.20 MSRP: $60.00You Save: $16.80 (28%)Ships in 1-2 Business DaysProduct Specifications- Other Name: Chain Wheel; Drive Gear
- Replaces: 270-052-03-00, 270-052-01-00, 270-052-02-00
Mercedes-Benz Crankshaft Gear Part Number: 615-052-01-12
$74.40 MSRP: $104.00You Save: $29.60 (29%)Ships in 1-2 Business DaysProduct Specifications- Other Name: Guide Gear
Mercedes-Benz Crankshaft Gear Part Number: 102-052-00-03
$124.80 MSRP: $174.00You Save: $49.20 (29%)Ships in 1-2 Business Days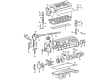
Mercedes-Benz Crankshaft Gear Part Number: 104-052-09-03
$188.40 MSRP: $262.00You Save: $73.60 (29%)Ships in 1-2 Business Days
| Page 1 of 2 |Next >
1-20 of 24 Results
Mercedes-Benz Crankshaft Timing Gear
Mercedes-Benz Crankshaft Timing Gear holds the crankshaft and camshaft locked into perfect rhythm, holds the valve timing in place to provide every piston stroke with smooth power and fuel efficiency, and by way of hardened teeth and vibration-damping core, keeps engines quiet and responsive even after thousands of miles. This vital part is teaming with the timing chain and sprockets to make up the heartbeat of any gasoline or diesel powerplant across the lineup, and by maintaining microscopic tolerances, preserves horsepower, protects against misfire, and supports the brand's reputation for durability. Beyond this hidden Crankshaft Timing Gear, Mercedes-Benz is notable for fusing elegant design with cutting-edge technology, from the intuitive MBUX voice-controlled infotainment system to energy recuperation features in hybrid and electric models. The company has helped drive innovation from the company's 1926 origins, and the recently announced MB.OS software platform will integrate driver assist, battery management, artificial intelligence, and multimedia into a single, seamless user experience. Every sedan, SUV, truck, and bus enjoys the philosophy that combines luxury and cutting-edge engineering to afford drivers style, safety, and performance in equal measure. Whether driving on the autobahn or through city streets, owners enjoy precise steering feel, strong safety systems, and interiors designed for comfort. Together, these qualities make for a loyal following that believes the brand will deliver vehicles that look sophisticated and feel future-ready.
Genuine parts are built to last. These components go through tough factory testing, so you can trust they will hold up over time. At MBPartsGiant.com, finding Mercedes-Benz Crankshaft Timing Gear is quick and simple. We keep a massive inventory in stock with low prices that are hard to beat. Just order online to get a real manufacturer's warranty with every single part. Returns won't be a headache either, thanks to our no-hassle policy. If you are in a rush, we provide expedited shipping to get your vehicle back on the road. Don't wait. Finish your repairs today and keep your Mercedes-Benz running like new. Explore the catalog now.
Mercedes-Benz Crankshaft Timing Gear Parts and Q&A
- Q: How to remove and refit the Cam Gear, Crankshaft Timing Gear, Timing Chain Guide and Timing Chain Tensioner in the Four-cylinder petrol engine on Mercedes-Benz 190E?A:The tensioner may be released by disconnecting battery negative lead, removing the auxiliary drivebelt(s), and, to better access, by removing the alternator. Unscrew the timing chain tensioner cover nut on right-hand side of engine and remove the spring and sealing ring. With a large Allen key or other hexagon bit, unscrew the tensioner body out of the cylinder block, and force the tensioner plunger and locking clip out of the tensioner body. Wipe the tensioner parts and check the plunger and body surface being damaged or worn and locking clip and tensioner spring, replacing as needed. To refit it, screw the tensioner body into the cylinder block and unscrew it to the designated torque, then insert the plunger with the locking clip into the body until it slides to the detent making sure that the smaller end of the plunger fits against the rail of the tensioner. Install a spring and new sealing ring on the cover nut, push it in and screw it onto the tensioner body, tightening it to the recommended torque and then reinstall the alternator and the auxiliary drivebelt(s), re-connecting the battery negative lead. In the case of the camshaft sprocker, take out the air cleaner unit, fan fans, fan shroud, and with some models, even bypass the hydraulic compressed pump of the self-leveling suspension system. Take off the cover of the camshaft, rotate the engine until No 1 piston reaches TDC, and take off the tensioner of timing chain. Mark reference on camshaft sprocket and another timing chain link, hold the camshaft, unscrew the sprocket bolt and remove the sprocket out of camshaft maintaining chain tension. Check sprocket teeth wear, etc. To refit follow the steps used in installation below: match the camshaft and crankshaft timing marks, insert the sprocket into the chain, and place it properly on the camshaft. Install securing bolt and washer of sprocket: screw on, according to specified torque, and verify timing marks by turning engine two complete revolutions. Install camshaft cover, self-adjusting suspension hydraulic pump, cooling fan blades and shroud and air cleaner assembly. Removal of crankshaft sprocket- remove the timing chain cover, make reference marks, remove the camshaft sprocket. When needed, loosen the timing chain tensioner rail, abscond the oil pump drive collar, disengage the timing chain of the crankshaft sprocket and remove the sprocket. Check wear of the oil pump drive collar and replace, where necessary. To refit, secure the Woodruff key, and tap the sprocket by hammering it on the crankshaft and lock the timing chain to the sprocket and ensure that the marks are aligned. Install timing chain tensioner rail, timing chain sprocket and camshaft sprocket, followed by timing cover. In the case of guide rails; disassemble the cover of the timing chain, extract the locating lugs chain guide, and examine whether it is worn or damaged, which must be replaced. Refit by making the guide rail snap in place. With the upper guide rail, loosen the guide rail locating pins with a slide hammer, then remove the camshaft sprocket and then check on the wear or any damage incurred on the guide rail before installation. In single-row timing-chain models, use the tensioner rail, which in this type of system is provided with just one sprock on the camshaft, lift the timing chain cover and the sprock on the cam shaft and bend the tensioner outward and check to confirm that it is neither worn nor damaged then are the components refitted. In the case of the double-row timing chain, the timing chain cover and the camshaft sprocker should be removed, pivot pin hole should be drilled, slide hammer used to erase the pin than take a look at the rail and reattach it with new pivot pin.
Related Mercedes-Benz Parts
 Mercedes-Benz Tail Light
 Mercedes-Benz Ashtray
 Mercedes-Benz Cup Holder
 Mercedes-Benz Crankshaft Position Sensor
 Mercedes-Benz Intake Manifold
 Mercedes-Benz Mass Air Flow Sensor
 Mercedes-Benz Interior Door Handle
 Mercedes-Benz A/C Clutch
 Mercedes-Benz Automatic Transmission Oil Cooler
 Mercedes-Benz Coolant Pipe
 Mercedes-Benz Oil Pan Gasket
 Mercedes-Benz Valve Spring Retainer Keeper
Browse by Model
190E Crankshaft Timing Gear 260E Crankshaft Timing Gear 300CD Crankshaft Timing Gear 300CE Crankshaft Timing Gear 300D Crankshaft Timing Gear 300E Crankshaft Timing Gear 300SE Crankshaft Timing Gear 300SEL Crankshaft Timing Gear 300SL Crankshaft Timing Gear 300TD Crankshaft Timing Gear 300TE Crankshaft Timing Gear 600SEC Crankshaft Timing Gear 600SEL Crankshaft Timing Gear 600SL Crankshaft Timing Gear A220 Crankshaft Timing Gear A35 AMG Crankshaft Timing Gear C220 Crankshaft Timing Gear C230 Crankshaft Timing Gear C240 Crankshaft Timing Gear C250 Crankshaft Timing Gear C280 Crankshaft Timing Gear C300 Crankshaft Timing Gear C32 AMG Crankshaft Timing Gear C320 Crankshaft Timing Gear C350 Crankshaft Timing Gear C350e Crankshaft Timing Gear C400 Crankshaft Timing Gear C43 AMG Crankshaft Timing Gear C450 AMG Crankshaft Timing Gear C55 AMG Crankshaft Timing Gear C63 AMG Crankshaft Timing Gear CL500 Crankshaft Timing Gear CL55 AMG Crankshaft Timing Gear CL550 Crankshaft Timing Gear CL600 Crankshaft Timing Gear CL63 AMG Crankshaft Timing Gear CL65 AMG Crankshaft Timing Gear CLA250 Crankshaft Timing Gear CLA35 AMG Crankshaft Timing Gear CLA45 AMG Crankshaft Timing Gear CLK320 Crankshaft Timing Gear CLK350 Crankshaft Timing Gear CLK430 Crankshaft Timing Gear CLK500 Crankshaft Timing Gear CLK55 AMG Crankshaft Timing Gear CLK550 Crankshaft Timing Gear CLK63 AMG Crankshaft Timing Gear CLS400 Crankshaft Timing Gear CLS500 Crankshaft Timing Gear CLS55 AMG Crankshaft Timing Gear CLS550 Crankshaft Timing Gear CLS63 AMG Crankshaft Timing Gear CLS63 AMG S Crankshaft Timing Gear E300 Crankshaft Timing Gear E320 Crankshaft Timing Gear E350 Crankshaft Timing Gear E400 Crankshaft Timing Gear E43 AMG Crankshaft Timing Gear E430 Crankshaft Timing Gear E450 Crankshaft Timing Gear E500 Crankshaft Timing Gear E55 AMG Crankshaft Timing Gear E550 Crankshaft Timing Gear E63 AMG Crankshaft Timing Gear E63 AMG S Crankshaft Timing Gear G500 Crankshaft Timing Gear G55 AMG Crankshaft Timing Gear G550 Crankshaft Timing Gear G63 AMG Crankshaft Timing Gear G65 AMG Crankshaft Timing Gear GL320 Crankshaft Timing Gear GL350 Crankshaft Timing Gear GL450 Crankshaft Timing Gear GL550 Crankshaft Timing Gear GL63 AMG Crankshaft Timing Gear GLA250 Crankshaft Timing Gear GLA35 AMG Crankshaft Timing Gear GLA45 AMG Crankshaft Timing Gear GLB250 Crankshaft Timing Gear GLB35 AMG Crankshaft Timing Gear GLC300 Crankshaft Timing Gear GLC350e Crankshaft Timing Gear GLC43 AMG Crankshaft Timing Gear GLE350 Crankshaft Timing Gear GLE400 Crankshaft Timing Gear GLE43 AMG Crankshaft Timing Gear GLE450 AMG Crankshaft Timing Gear GLE550e Crankshaft Timing Gear GLE63 AMG Crankshaft Timing Gear GLE63 AMG S Crankshaft Timing Gear GLK350 Crankshaft Timing Gear GLS450 Crankshaft Timing Gear GLS550 Crankshaft Timing Gear GLS63 AMG Crankshaft Timing Gear Metris Crankshaft Timing Gear ML320 Crankshaft Timing Gear ML350 Crankshaft Timing Gear ML400 Crankshaft Timing Gear ML430 Crankshaft Timing Gear ML450 Crankshaft Timing Gear ML500 Crankshaft Timing Gear ML55 AMG Crankshaft Timing Gear ML550 Crankshaft Timing Gear ML63 AMG Crankshaft Timing Gear R320 Crankshaft Timing Gear R350 Crankshaft Timing Gear R500 Crankshaft Timing Gear R63 AMG Crankshaft Timing Gear S320 Crankshaft Timing Gear S350 Crankshaft Timing Gear S400 Crankshaft Timing Gear S430 Crankshaft Timing Gear S450 Crankshaft Timing Gear S500 Crankshaft Timing Gear S55 AMG Crankshaft Timing Gear S550 Crankshaft Timing Gear S550e Crankshaft Timing Gear S560e Crankshaft Timing Gear S600 Crankshaft Timing Gear S63 AMG Crankshaft Timing Gear S65 AMG Crankshaft Timing Gear SL320 Crankshaft Timing Gear SL400 Crankshaft Timing Gear SL450 Crankshaft Timing Gear SL500 Crankshaft Timing Gear SL55 AMG Crankshaft Timing Gear SL550 Crankshaft Timing Gear SL600 Crankshaft Timing Gear SL63 AMG Crankshaft Timing Gear SL65 AMG Crankshaft Timing Gear SLC300 Crankshaft Timing Gear SLC43 AMG Crankshaft Timing Gear SLK230 Crankshaft Timing Gear SLK250 Crankshaft Timing Gear SLK280 Crankshaft Timing Gear SLK300 Crankshaft Timing Gear SLK32 AMG Crankshaft Timing Gear SLK320 Crankshaft Timing Gear SLK350 Crankshaft Timing Gear SLK55 AMG Crankshaft Timing Gear Sprinter 1500 Crankshaft Timing Gear Sprinter 2500 Crankshaft Timing Gear Sprinter 3500 Crankshaft Timing Gear Sprinter 3500XD Crankshaft Timing Gear