×
- Hello
- Login or Register
- Quick Links
- Live Chat
- Track Order
- Parts Availability
- RMA
- Help Center
- Contact Us
- Shop for
- Mercedes-Benz Parts
My Garage
My Account
Cart
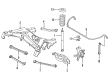
Genuine 1993 Mercedes-Benz 190E Shock Absorber
Suspension Shock Absorber- Select Vehicle by Model
- Select Vehicle by VIN
Select Vehicle by Model
orMake
Model
Year
Select Vehicle by VIN
For the most accurate results, select vehicle by your VIN (Vehicle Identification Number).
2 Shock Absorbers found

1993 Mercedes-Benz 190E Shock Absorber Part Number: 201-320-12-31
$190.80 MSRP: $266.00You Save: $75.20 (29%)Ships in 1-2 Business DaysProduct Specifications- Replaced by: 201-326-19-00
- Item Weight: 5.60 Pounds
- Condition: New
- Fitment Type: Direct Replacement
- SKU: 201-320-12-31
- Warranty: This genuine part is guaranteed by Mercedes-Benz's factory warranty.
1993 Mercedes-Benz 190E Shock Absorber Part Number: 201-320-11-31
$132.00 MSRP: $184.00You Save: $52.00 (29%)Ships in 1-2 Business DaysProduct Specifications- Replaced by: 201-326-18-00
- Item Weight: 5.60 Pounds
- Condition: New
- Fitment Type: Direct Replacement
- SKU: 201-320-11-31
- Warranty: This genuine part is guaranteed by Mercedes-Benz's factory warranty.
1993 Mercedes-Benz 190E Shock Absorber Parts Q&A
- Q: How to remove and refit a shock absorber on 1993 Mercedes-Benz 190E?A: This procedure does not apply to models fitted with self-leveling rear suspension. A new shock absorber lower mounting bolt nut will be required on refitting. Begin by checking the front wheels, then jack up the rear of the vehicle and support it on axle stands. For improved access, remove the rear roadwheel. Undo the retaining screws and remove the protective cover from the base of the suspension lower arm, positioning a jack and block of wood underneath the lower arm to support its weight. Remove the luggage compartment side trim panel to access the shock absorber upper mounting. Retain the shock absorber upper mounting nut with an open-ended spanner, slacken and remove the locknut, then unscrew the upper mounting nut while ensuring the shock absorber body/piston rod does not rotate, lifting off the washer and rubber mounting. From underneath the vehicle, slacken and remove the shock absorber lower mounting bolt nut, withdrawing the bolt and washers. Carefully lower the suspension arm slightly, then maneuver the shock absorber out from underneath the wheelarch, recovering the mounting rubber from its upper end. On later models, also remove the spacer fitted to the upper mounting rubbers and remove the dust cover from the shock absorber, sliding off the bump stop. Examine the shock absorber for signs of fluid leakage, check the piston for pitting, and inspect the body for damage. Test the operation of the shock absorber by moving the piston through full and short strokes, ensuring the resistance is smooth and continuous; if it is jerky or uneven, renewal is necessary. Inspect all other components for damage or deterioration and renew any that are suspect. On later models, slide the bump stop onto the shock absorber piston, then refit the dust cover and spacer. Fit the lower mounting rubbers to the shock absorber and maneuver it into position, engaging the lower end with the suspension arm and inserting the mounting bolt. Fit a new nut to the bolt, tightening it lightly at this stage. Raise the lower suspension arm while ensuring the shock absorber upper end locates correctly in the body. From inside the luggage compartment, fit the upper mounting rubber and washer to the top of the shock absorber, screwing on the upper mounting nut and ensuring the mounting rubber is correctly located before tightening the nut to the specified torque setting while preventing the shock absorber body/piston from rotating. Hold the upper mounting nut stationary, then refit the locknut and tighten it to the specified torque. Refit the luggage compartment trim panel, then the roadwheel, lowering the vehicle to the ground and tightening the wheel bolts to the specified torque. With the vehicle resting on its wheels, rock it to settle the shock absorber in position, then tighten the lower mounting bolt nut to the specified torque setting. Finally, refit the protective cover to the lower arm and securely tighten its retaining screws.
Related 1993 Mercedes-Benz 190E Parts
 1993 Mercedes-Benz 190E Fuel Pressure Regulator
 1993 Mercedes-Benz 190E ABS Relay
 1993 Mercedes-Benz 190E Air Bag Clockspring
 1993 Mercedes-Benz 190E Brake Booster
 1993 Mercedes-Benz 190E Cooling Fan Shroud
 1993 Mercedes-Benz 190E Crankshaft
 1993 Mercedes-Benz 190E Exhaust Manifold
 1993 Mercedes-Benz 190E Oil Filter Housing