×
- Hello
- Login or Register
- Quick Links
- Live Chat
- Track Order
- Parts Availability
- RMA
- Help Center
- Contact Us
- Shop for
- Mercedes-Benz Parts
My Garage
My Account
Cart
Genuine Mercedes-Benz 190E Timing Chain Tensioner
Engine Timing Chain Tensioner- Select Vehicle by Model
- Select Vehicle by VIN
Select Vehicle by Model
orMake
Model
Year
Select Vehicle by VIN
For the most accurate results, select vehicle by your VIN (Vehicle Identification Number).
3 Timing Chain Tensioners found

Mercedes-Benz 190E Tensioner Part Number: 103-050-06-11
$90.00 MSRP: $125.00You Save: $35.00 (28%)Ships in 1-2 Business Days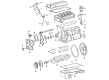
Mercedes-Benz 190E Tensioner Part Number: 102-050-10-11
$132.00 MSRP: $184.00You Save: $52.00 (29%)Ships in 1-2 Business DaysMercedes-Benz 190E Tensioner Part Number: 102-050-04-16
Mercedes-Benz 190E Timing Chain Tensioner
Every OEM part goes through strict quality checks. The checks keep you safe and make Timing Chain Tensioner tough. They keep performance the same as your original parts. If your Mercedes-Benz 190E needs OEM parts, visit our catalog. You will find extensive genuine Mercedes-Benz 190E parts. We offer a wide selection at competitive prices, and with clear fit details and simple guidance, choosing what you need is effortless. Each of our parts has a manufacturer's warranty. You will like our simple return policy. We pack and ship fast, and you get your order quickly. Shopping here feels easy and enjoyable.
Mercedes-Benz 190E Timing Chain Tensioner Parts and Q&A
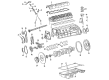
- Q: How to remove and refit the Cam Gear, Crankshaft Timing Gear, Timing Chain Guide and Timing Chain Tensioner in the Four-cylinder petrol engine on Mercedes-Benz 190E?A:The tensioner may be released by disconnecting battery negative lead, removing the auxiliary drivebelt(s), and, to better access, by removing the alternator. Unscrew the Timing Chain tensioner cover nut on right-hand side of engine and remove the spring and sealing ring. With a large Allen key or other hexagon bit, unscrew the tensioner body out of the cylinder block, and force the tensioner plunger and locking clip out of the tensioner body. Wipe the tensioner parts and check the plunger and body surface being damaged or worn and locking clip and tensioner spring, replacing as needed. To refit it, screw the tensioner body into the cylinder block and unscrew it to the designated torque, then insert the plunger with the locking clip into the body until it slides to the detent making sure that the smaller end of the plunger fits against the rail of the tensioner. Install a spring and new sealing ring on the cover nut, push it in and screw it onto the tensioner body, tightening it to the recommended torque and then reinstall the alternator and the auxiliary drivebelt(s), re-connecting the battery negative lead. In the case of the camshaft sprocker, take out the air cleaner unit, fan fans, fan shroud, and with some models, even bypass the hydraulic compressed pump of the self-leveling suspension system. Take off the cover of the camshaft, rotate the engine until No 1 piston reaches TDC, and take off the tensioner of timing chain. Mark reference on camshaft sprocket and another timing chain link, hold the camshaft, unscrew the sprocket bolt and remove the sprocket out of camshaft maintaining chain tension. Check sprocket teeth wear, etc. To refit follow the steps used in installation below: match the camshaft and crankshaft timing marks, insert the sprocket into the chain, and place it properly on the camshaft. Install securing bolt and washer of sprocket: screw on, according to specified torque, and verify timing marks by turning engine two complete revolutions. Install camshaft cover, self-adjusting suspension hydraulic pump, cooling fan blades and shroud and air cleaner assembly. Removal of crankshaft sprocket- remove the timing chain cover, make reference marks, remove the camshaft sprocket. When needed, loosen the timing chain tensioner rail, abscond the oil pump drive collar, disengage the timing chain of the crankshaft sprocket and remove the sprocket. Check wear of the oil pump drive collar and replace, where necessary. To refit, secure the Woodruff key, and tap the sprocket by hammering it on the crankshaft and lock the timing chain to the sprocket and ensure that the marks are aligned. Install timing chain tensioner rail, timing chain sprocket and camshaft sprocket, followed by timing cover. In the case of guide rails; disassemble the cover of the timing chain, extract the locating lugs chain guide, and examine whether it is worn or damaged, which must be replaced. Refit by making the guide rail snap in place. With the upper guide rail, loosen the guide rail locating pins with a slide hammer, then remove the camshaft sprocket and then check on the wear or any damage incurred on the guide rail before installation. In single-row timing-chain models, use the tensioner rail, which in this type of system is provided with just one sprock on the camshaft, lift the timing chain cover and the sprock on the cam shaft and bend the tensioner outward and check to confirm that it is neither worn nor damaged then are the components refitted. In the case of the double-row timing chain, the timing chain cover and the camshaft sprocker should be removed, pivot pin hole should be drilled, slide hammer used to erase the pin than take a look at the rail and reattach it with new pivot pin.
- Q: How to remove, inspect, and refit the Cam Gear, Crankshaft Timing Gear, Timing Chain Guide and Timing Chain Tensioner in the Diesel engine on Mercedes-Benz 190E?A:Possibly, by unscrewing the tensioner body of the cylinder head but not the cover, plug, and reclaim the sealing ring to eliminate the tensioner. Make no attempt to dismantle the tensioner assembly, unless necessary; it may be worn out or faulty, in which case change the whole. Prior to refitting, fill the tensioner with oil, i.e. plunge in engine oil and press the plunger seven to ten times until it bottoms out in the stopping plunge, to avoid the plunger hardening thenceforth. Insert the tensioner in the cylinder head and screw tight with the correct amount of torque. According to the case of camshaft sprocket, lift off the auxiliary drivebelt and camshaft cover, and subsequently the tensioner of the timing chain. Mark the timing chain and camshaft sprocket, where relevant, and remove the self-leveling suspension hydraulic pump and line so that No 1 piston aligns at TDC. Weakly loosen the sprocket on the bolt, without turning the camshaft, then reclaim the washer, and remove the sprocket itself, observing its position. Check the teeth on the sprocket, should it be concave, change the sprocket. When refitting, align timing marks, fit the sprocket into the chain and clamp it with the bolt and washer. Install the hydraulic pump (where applicable) and tensioner of the timing chain and, after one full crankshaft rotation, make sure everything was properly aligned. Install camshaft cover and auxiliary drivebelt. The crankshaft sprocker is the same, but you should take the timing chain cover and sump off followed by the camshaft sprocker and leave the timing chain dangling. Take the oil pump drive chain tensioner rail and spring off, unscrew the oil pump drive sprocket and take alignment marks. Take the crankshaft sprocket off using a puller and recapture loose Woodruff key. Installation Use realignment marks to transfer to a new sprocket (refit the Woodruff key accordingly), install the timing chain so that both sprockets are engaged and snap the oil pump sprocket and chain in place before replacing the chain. Connect the sump and timing chain cover with the oil pump drive chain tensioner rail and spring, and then remount the oil pump drive chain tensioner rail. On the fuel injection pump sprocket, follow the given procedure. You have to disinstal the cylinder head and timing chain cover before removing the tensioner rail by pulling it out of its lugs. Check wear or damage and change as necessary. Install timing chain tensioner, cultivator and timing cover toprail, and cylinder head. In the case of upper guide rail, unscrew a camshaft sprocket on the bottom-side of the upper guide rail, screw a bolt on a location pin of the guide rail, and use a slide hammer to chisel out the location pin without dropping the rail into the housing. Take off the guide rail and examine wear. The installation reattaches the guide rail by adhering it in place with sealant in the pins. Last, re-fit the camshaft sprocket. To disassemble the lower guide rail, take out the timing chain tensioner and timing chain cover, then remove the guide rail out of its pin and check the wear on it, and replace the guide rail on the pin again, and reattach timing chain tensioner and timing chain tensioner cover.


