×
- Hello
- Login or Register
- Quick Links
- Live Chat
- Track Order
- Parts Availability
- RMA
- Help Center
- Contact Us
- Shop for
- Mercedes-Benz Parts
My Garage
My Account
Cart
Genuine Mercedes-Benz 190E Timing Chain
Engine Timing Chain- Select Vehicle by Model
- Select Vehicle by VIN
Select Vehicle by Model
orMake
Model
Year
Select Vehicle by VIN
For the most accurate results, select vehicle by your VIN (Vehicle Identification Number).
3 Timing Chains found

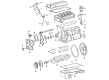
Mercedes-Benz 190E Timing Chain Part Number: 002-997-03-94
$122.40 MSRP: $170.00You Save: $47.60 (28%)Ships in 1-2 Business Days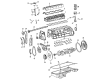
Mercedes-Benz 190E Timing Chain Part Number: 003-997-80-94
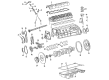
Mercedes-Benz 190E Timing Chain Part Number: 003-997-84-94
Mercedes-Benz 190E Timing Chain
Every OEM part goes through strict quality checks. The checks keep you safe and make Timing Chain tough. They keep performance the same as your original parts. If your Mercedes-Benz 190E needs OEM parts, visit our catalog. You will find extensive genuine Mercedes-Benz 190E parts. We offer a wide selection at competitive prices, and with clear fit details and simple guidance, choosing what you need is effortless. Each of our parts has a manufacturer's warranty. You will like our simple return policy. We pack and ship fast, and you get your order quickly. Shopping here feels easy and enjoyable.
Mercedes-Benz 190E Timing Chain Parts and Q&A
- Q: How to inspect and renewe the timing chain in the Four-cylinder petrol engine on Mercedes-Benz 190E?A:The timing chain can be inspected by first removing the air cleaner assembly and the camshaft cover. Connect a socket to the crankshaft pulley/vibration damper hub bolt to rotate the engine so that the entire chain of the camshaft sprocket can be seen. The chain must be changed when the sprocket or chain demonstrates signs of wear including an excessive amount of lateral motion or noises and changing the chain is recommended when the engine is undergoing an overhaul. To refresh, make sure to have a portable electric grinder and a new chain that has a connecting link. Disengage battery negative cable and spark plugs and slot tensioner of timing chain. Wrap clean rags all around the camshaft and camshaft opening except the camshaft sprocket. Carefully grind the protruding lugs using the grinder of a chain link, and then remove the plate on which the link is attached and squeeze the link out. Once the rags came out, one end of the new chain should be attached to the old chain, so that when the engine spins clockwise it pulls the chain around the sprockets and guides. Keep the new chain stretched as you run it around the sprockets and guides, so that the old chain does not come off the crankshaft sprocket. Turn the crank slowly clockwise and maintain a tension in the new chain until it slips, then remove the attachment to the old one and pull the old chain out. Connect the new chain to the camshaft sprocker, connect the ends to the other end of the connector link at the back, and fix the plate of the link by flattening the ends of the link pins. Check whether the chain link is secure with no burring or loose swarf. Reefit the chain tensioner, rotate the engine clockwise to position No 1 piston at TDC and check that timing marks are aligned. In the event that the timing chain is developed by a single tooth turn the position of the camshaft sprocket. Lastly, install the spark plugs, camshaft cover, air cleaner assembly and re-connect battery negative lead.
Related Mercedes-Benz 190E Parts
 Mercedes-Benz 190E A/C Switch
 Mercedes-Benz 190E Air Filter
 Mercedes-Benz 190E Coil Springs
 Mercedes-Benz 190E Differential
 Mercedes-Benz 190E Door Lock Switch
 Mercedes-Benz 190E Engine Mount
 Mercedes-Benz 190E Pressure Plate
 Mercedes-Benz 190E Sway Bar Link
 Mercedes-Benz 190E Windshield Wiper Motors