×
- Hello
- Login or Register
- Quick Links
- Live Chat
- Track Order
- Parts Availability
- RMA
- Help Center
- Contact Us
- Shop for
- Mercedes-Benz Parts
My Garage
My Account
Cart
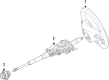
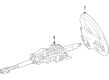
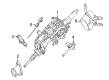
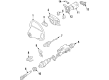
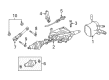
Genuine Mercedes-Benz Steering Column
Steering Column Tilt- Select Vehicle by Model
- Select Vehicle by VIN
Select Vehicle by Model
orMake
Model
Year
Select Vehicle by VIN
For the most accurate results, select vehicle by your VIN (Vehicle Identification Number).
79 Steering Columns found

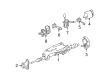
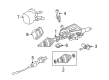
Mercedes-Benz Steering Column Part Number: 164-460-08-16
$283.20 MSRP: $394.00You Save: $110.80 (29%)Ships in 1-2 Business DaysProduct Specifications- Other Name: Steering Column Jacket Tube

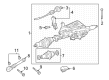
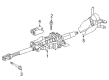
Mercedes-Benz Steering Column Part Number: 204-460-45-16
$398.40 MSRP: $555.00You Save: $156.60 (29%)Ships in 1-2 Business DaysProduct Specifications- Other Name: Column Assembly
- Replaces: 204-460-02-16, 204-460-03-16, 204-460-18-16, 204-460-19-16


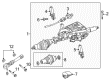
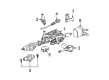
Mercedes-Benz Steering Column Part Number: 907-460-44-02
$476.52 MSRP: $665.00You Save: $188.48 (29%)Product Specifications- Other Name: Steering Column, Adjustable
- Replaced by: 907-460-81-04

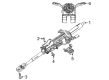
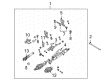
Mercedes-Benz Steering Column Part Number: 204-460-46-16
$656.40 MSRP: $915.00You Save: $258.60 (29%)Ships in 1-2 Business DaysProduct Specifications- Other Name: Column Assembly
- Replaces: 204-460-30-16, 204-460-21-16, 204-460-05-16, 204-460-04-16, 204-460-20-16

Mercedes-Benz Steering Column Part Number: 177-460-29-00
$433.20 MSRP: $605.00You Save: $171.80 (29%)Ships in 1-2 Business DaysProduct Specifications- Other Name: Column Assembly

Mercedes-Benz Steering Column Part Number: 204-460-36-16
$511.20 MSRP: $710.00You Save: $198.80 (28%)Ships in 1-2 Business DaysProduct Specifications- Other Name: Steering Column Jacket Tube

Mercedes-Benz Steering Column Part Number: 246-460-88-01
$483.60 MSRP: $675.00You Save: $191.40 (29%)Ships in 1-2 Business DaysProduct Specifications- Other Name: Column Assembly
- Replaces: 246-460-23-16-80, 246-460-25-16, 246-460-25-16-28, 246-460-23-16

Mercedes-Benz Steering Column Part Number: 204-460-24-16
$624.00 MSRP: $870.00You Save: $246.00 (29%)Ships in 1-2 Business DaysProduct Specifications- Other Name: Steering Column Jacket Tube; Column Assembly
- Replaced by: 204-460-47-16

Mercedes-Benz Steering Column Part Number: 171-460-08-16
$490.80 MSRP: $685.00You Save: $194.20 (29%)Ships in 1-2 Business DaysProduct Specifications- Other Name: Steering Column Jacket Tube; Jacket

Mercedes-Benz Steering Column Part Number: 213-460-07-16
$696.00 MSRP: $970.00You Save: $274.00 (29%)Ships in 1-2 Business DaysProduct Specifications- Replaced by: 213-460-84-00

Mercedes-Benz Steering Column Part Number: 253-460-29-00
$696.00 MSRP: $970.00You Save: $274.00 (29%)Ships in 1-2 Business Days
Mercedes-Benz Steering Column Part Number: 166-460-63-00
$550.80 MSRP: $765.00You Save: $214.20 (28%)Ships in 1-2 Business DaysProduct Specifications- Replaces: 166-460-09-16, 166-460-10-16, 166-460-12-16
Mercedes-Benz Steering Column Part Number: 253-460-42-00
$834.00 MSRP: $1160.00You Save: $326.00 (29%)Ships in 1-2 Business DaysProduct Specifications- Other Name: Column Assembly
- Replaces: 253-460-30-00, 253-460-07-16
Mercedes-Benz Steering Column Part Number: 204-460-47-16
$624.00 MSRP: $870.00You Save: $246.00 (29%)Ships in 1-2 Business DaysProduct Specifications- Other Name: Column Assembly
- Replaces: 204-460-24-16, 204-460-25-16
Mercedes-Benz Steering Column Part Number: 164-460-09-16
$876.00 MSRP: $1220.00You Save: $344.00 (29%)Ships in 1-2 Business DaysProduct Specifications- Other Name: Steering Column Jacket Tube
Mercedes-Benz Steering Column Part Number: 204-460-22-16
$644.40 MSRP: $895.00You Save: $250.60 (28%)Ships in 1-2 Business DaysProduct Specifications- Other Name: Column Assembly
- Replaces: 204-460-06-16

Mercedes-Benz Steering Column Part Number: 211-460-40-16
$624.00 MSRP: $870.00You Save: $246.00 (29%)Ships in 1-2 Business DaysProduct Specifications- Other Name: Steering Column Jacket Tube
- Replaces: 211-460-25-16, 211-460-28-16

Mercedes-Benz Steering Column Part Number: 218-460-13-16
$672.00 MSRP: $935.00You Save: $263.00 (29%)Ships in 1-2 Business DaysProduct Specifications- Other Name: Column Assembly
- Replaces: 218-460-05-16

Mercedes-Benz Steering Column Part Number: 208-460-16-16
Product Specifications- Other Name: Steering Column Jacket Tube; Jacket

Mercedes-Benz Steering Column Part Number: 163-460-05-16
Product Specifications- Other Name: Steering Column Jacket Tube
- Replaces: 163-460-04-16
| Page 1 of 4 |Next >
1-20 of 79 Results
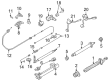
Mercedes-Benz Steering Column
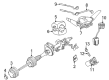
Mercedes-Benz Steering Column provides drivers with precise control and enhanced safety through the translation of wheel movements to the road and the absorption of crash forces in the event of an impact. Acting as the central connection between the steering wheel and the front axle, the Steering Column also contains an anti-theft lock and a tilt and reach adjustment that offers easy and convenient tilt and reach adjustment so that individuals of varying sizes can achieve a comfortable and confident posture without compromising responsiveness. A collapsible inner shaft fits into an outer tube in the event of heavy frontal forces, helping to shield the occupants by reducing the energy transfer to the cabin, and in modern car versions, electronic locking further deters unauthorized use while maintaining smooth operation. These universal features are beneficial to all cars in the lineup, making the component a silent guardian of stability either on daily trips or long highway drives. Over the decades, the broader Mercedes-Benz family has established a reputation for combining luxury with technology and robust engineering in passenger cars, trucks, and buses rolling out of its German headquarters. Founded in 1926 through the union of innovators who helped shape the history of the automobile, the brand is always innovative with breakthroughs such as the voice-controlled MBUX infotainment system, smart energy recovery in electric and hybrid powertrains, and the recent MB.OS platform that incorporates driver assist, battery management, and artificial intelligence. Stylish design combines with digital innovation to give owners vehicles that feel refined today and ready for tomorrow.
Genuine parts are built to last. These components go through tough factory testing, so you can trust they will hold up over time. At MBPartsGiant.com, finding Mercedes-Benz Steering Column is quick and simple. We keep a massive inventory in stock with low prices that are hard to beat. Just order online to get a real manufacturer's warranty with every single part. Returns won't be a headache either, thanks to our no-hassle policy. If you are in a rush, we provide expedited shipping to get your vehicle back on the road. Don't wait. Finish your repairs today and keep your Mercedes-Benz running like new. Explore the catalog now.
Mercedes-Benz Steering Column Parts and Q&A
- Q: How to remove the steering column on Mercedes-Benz C230?A:The steering column can be removed by initially lifting the front of the vehicle and supporting it and fortunately drive-on ramp style supports can be used to hold the wheels facing forward. Then take off the engine splash shields under the car and the small exhaust shield way up over the steering shaft coupler. Position the lower steering shaft relative to the steering shaft coupler, unscrew the bolt that holds the steering shaft lower portion in place and terminate the coupler and lower steering shaft apart by pushing the steering shaft up and out of the coupler depositing the little plate. Should it be necessary rotate lower steering shaft slightly to get to the retaining bolt being careful to put it back in the centered position or this push will cause damage to the clockspring. In 4MATIC models, the steering shaft coupler is similar to a universal joint and has a pinch bolt; note the position of the coupler with reference to the low steering shaft, loosen the pinch bolt, then divide the coupler into two parts. It is advisable to have the small plate that is placed between the lower steering shaft and the steering shaft coupler replaced on a rear wheel drive. Take off the lower trim panel of the instrument cluster that is above the braking and accelerating pedals. When equipped with an electric steering column lock, position the ignition key in the ACC position, unplug the negative battery terminal and then remove the recessed retaining bolt that holds the motor assembly to the steering column, slide the motor assembly facing the firewall and pull the electrical connector. Disassemble steering wheel, steering column switches, and clockspring, noting that as of models built after July 7, 2002 these may be disassembled as a package. Then unscrew the instrument cluster, any insulation that has been around the steering column, and remove the adjustment lever on the steering column. Unscrew the clip on top of the steering column cover and pull it off and the electrical wiring harness. Undo the bottom steering column mounting bolt and the upper mounting bolts and then lift the column and the lower steering shaft out of the boot at the firewall being careful not to break the steering column. Installation requires you to push the steering column into place with the lower steering shaft passing through the boot at the firewall, install the mounting fasteners, but do not tighten them, lubricate the contact point of the shafts at the boot, position the steering column and then tighten the mounting fasteners at the correct torque level. Lastly, put the installation together in the same order as it was removed with the bottom steering shaft being carefully installed with the steering shaft coupler, using the index marks previously created with the steering shaft tubing, and the steering column being installed over this same tubing in the same way it was installed.

Related Mercedes-Benz Parts
 Mercedes-Benz Control Arm
 Mercedes-Benz Center Console
 Mercedes-Benz EGR Valve
 Mercedes-Benz Air Bag
 Mercedes-Benz Exhaust Manifold
 Mercedes-Benz Glove Box
 Mercedes-Benz Air Bag Control Module
 Mercedes-Benz Body Mount Hole Plug
 Mercedes-Benz CV Joint Boot
 Mercedes-Benz Door Check
 Mercedes-Benz Door Moldings
 Mercedes-Benz Ignition Coil Boot
Browse by Model
A220 Steering Column A35 AMG Steering Column AMG GT 43 Steering Column AMG GT 53 Steering Column AMG GT 63 S E Performance Steering Column AMG GT 63 S Steering Column AMG GT 63 Steering Column AMG GT Black Series Steering Column AMG GT C Steering Column AMG GT R Pro Steering Column AMG GT R Steering Column AMG GT S Steering Column AMG GT Steering Column B Electric Drive Steering Column B250e Steering Column C230 Steering Column C240 Steering Column C250 Steering Column C280 Steering Column C300 Steering Column C32 AMG Steering Column C320 Steering Column C350 Steering Column C350e Steering Column C400 Steering Column C43 AMG Steering Column C450 AMG Steering Column C55 AMG Steering Column C63 AMG S Steering Column C63 AMG Steering Column CL550 Steering Column CL600 Steering Column CL63 AMG Steering Column CL65 AMG Steering Column CLA250 Steering Column CLA35 AMG Steering Column CLA45 AMG Steering Column CLK320 Steering Column CLK350 Steering Column CLK430 Steering Column CLK500 Steering Column CLK55 AMG Steering Column CLK550 Steering Column CLK63 AMG Steering Column CLS400 Steering Column CLS450 Steering Column CLS500 Steering Column CLS53 AMG Steering Column CLS55 AMG Steering Column CLS550 Steering Column CLS63 AMG S Steering Column CLS63 AMG Steering Column E250 Steering Column E300 Steering Column E320 Steering Column E350 Steering Column E400 Steering Column E43 AMG Steering Column E450 Steering Column E500 Steering Column E53 AMG Steering Column E55 AMG Steering Column E550 Steering Column E63 AMG S Steering Column E63 AMG Steering Column EQB 250 Steering Column EQB 300 Steering Column EQB 350 Steering Column EQE 350 Steering Column EQE 350 SUV Steering Column EQE 350+ Steering Column EQE 350+ SUV Steering Column EQE 500 Steering Column EQE 500 SUV Steering Column EQE AMG Steering Column EQS 450 Steering Column EQS 450 SUV Steering Column EQS 450+ Steering Column EQS 450+ SUV Steering Column EQS 580 Steering Column EQS 580 SUV Steering Column EQS AMG Steering Column G500 Steering Column G55 AMG Steering Column G550 Steering Column G63 AMG Steering Column G65 AMG Steering Column GL320 Steering Column GL350 Steering Column GL450 Steering Column GL550 Steering Column GL63 AMG Steering Column GLA250 Steering Column GLA35 AMG Steering Column GLA45 AMG Steering Column GLB250 Steering Column GLB35 AMG Steering Column GLC300 Steering Column GLC350e Steering Column GLC43 AMG Steering Column GLC63 AMG S Steering Column GLC63 AMG Steering Column GLE300d Steering Column GLE350 Steering Column GLE400 Steering Column GLE43 AMG Steering Column GLE450 AMG Steering Column GLE450 Steering Column GLE53 AMG Steering Column GLE550e Steering Column GLE580 Steering Column GLE63 AMG S Steering Column GLE63 AMG Steering Column GLK250 Steering Column GLK350 Steering Column GLS350d Steering Column GLS450 Steering Column GLS550 Steering Column GLS580 Steering Column GLS63 AMG Steering Column ML250 Steering Column ML320 Steering Column ML350 Steering Column ML400 Steering Column ML430 Steering Column ML450 Steering Column ML500 Steering Column ML55 AMG Steering Column ML550 Steering Column ML63 AMG Steering Column R320 Steering Column R350 Steering Column R500 Steering Column R63 AMG Steering Column S350 Steering Column S400 Steering Column S450 Steering Column S500 Steering Column S550 Steering Column S550e Steering Column S560 Steering Column S560e Steering Column S580 Steering Column S580e Steering Column S600 Steering Column S63 AMG Steering Column S65 AMG Steering Column SL500 Steering Column SL55 AMG Steering Column SL550 Steering Column SL600 Steering Column SL63 AMG Steering Column SL65 AMG Steering Column SLC300 Steering Column SLC43 AMG Steering Column SLK250 Steering Column SLK280 Steering Column SLK300 Steering Column SLK350 Steering Column SLK55 AMG Steering Column Sprinter 1500 Steering Column Sprinter 2500 Steering Column Sprinter 3500 Steering Column Sprinter 3500XD Steering Column