×
- Hello
- Login or Register
- Quick Links
- Live Chat
- Track Order
- Parts Availability
- RMA
- Help Center
- Contact Us
- Shop for
- Mercedes-Benz Parts
My Garage
My Account
Cart
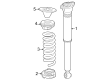
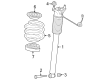
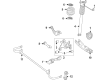
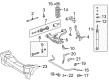
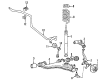
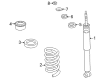
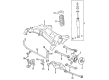
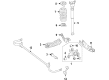
Genuine Mercedes-Benz Shock Absorber
Suspension Shock Absorber- Select Vehicle by Model
- Select Vehicle by VIN
Select Vehicle by Model
orMake
Model
Year
Select Vehicle by VIN
For the most accurate results, select vehicle by your VIN (Vehicle Identification Number).
537 Shock Absorbers found


Mercedes-Benz Shock Part Number: 294-320-11-00
$180.66 MSRP: $252.00You Save: $71.34 (29%)Ships in 1-2 Business DaysProduct Specifications- Other Name: Shock Absorber
- Replaced by: 294-320-53-01


Mercedes-Benz Shock Part Number: 243-320-77-00
$74.40 MSRP: $104.00You Save: $29.60 (29%)Ships in 1-2 Business DaysProduct Specifications- Other Name: Shock Absorber
- Replaces: 243-320-73-00, 243-320-79-00, 243-320-71-00


Mercedes-Benz Shock Absorber Part Number: 219-326-05-00
$73.20 MSRP: $102.00You Save: $28.80 (29%)Ships in 1-2 Business DaysProduct Specifications- Other Name: Shock
- Replaces: 219-326-02-00


Mercedes-Benz Shock Absorber Part Number: 177-320-55-03
$92.40 MSRP: $129.00You Save: $36.60 (29%)Ships in 1-2 Business DaysProduct Specifications- Other Name: Shock
- Replaces: 177-320-89-02, 177-320-00-31


Mercedes-Benz Shock Absorber Part Number: 247-320-68-04
$96.00 MSRP: $134.00You Save: $38.00 (29%)Ships in 1-2 Business DaysProduct Specifications- Other Name: Shock
- Replaces: 247-320-69-04, 247-320-98-03


Mercedes-Benz Shock Absorber Part Number: 247-320-96-03
$98.40 MSRP: $137.00You Save: $38.60 (29%)Ships in 1-2 Business DaysProduct Specifications- Other Name: Shock


Mercedes-Benz Shock Absorber Part Number: 202-320-08-30
$165.60 MSRP: $230.00You Save: $64.40 (28%)Ships in 1-2 Business DaysProduct Specifications- Other Name: Shock
- Replaced by: 202-323-39-00


Mercedes-Benz Shock Absorber Part Number: 176-320-19-31
$106.80 MSRP: $149.00You Save: $42.20 (29%)Ships in 1-2 Business DaysProduct Specifications- Other Name: Shock


Mercedes-Benz Shock Absorber Part Number: 117-320-10-31
$118.80 MSRP: $165.00You Save: $46.20 (28%)Ships in 1-2 Business Days
Mercedes-Benz Shock Absorber Part Number: 118-320-11-01
$104.40 MSRP: $145.00You Save: $40.60 (28%)Ships in 1-2 Business DaysProduct Specifications- Other Name: Shock
- Replaces: 118-320-99-00, 118-320-07-00

Mercedes-Benz Shock Absorber Part Number: 171-320-05-30
$373.20 MSRP: $520.00You Save: $146.80 (29%)Ships in 1-2 Business DaysProduct Specifications- Other Name: Strut
Mercedes-Benz Shock Absorber Part Number: 247-326-19-00
$162.00 MSRP: $226.00You Save: $64.00 (29%)Ships in 1-2 Business DaysProduct Specifications- Other Name: Shock

Mercedes-Benz Shock Absorber Part Number: 210-320-05-31
$124.80 MSRP: $174.00You Save: $49.20 (29%)Ships in 1-2 Business DaysProduct Specifications- Other Name: Shock
- Replaced by: 210-326-12-00

Mercedes-Benz Shock Absorber Part Number: 210-320-03-30
$146.40 MSRP: $204.00You Save: $57.60 (29%)Ships in 1-2 Business DaysProduct Specifications- Replaced by: 210-323-50-00
Mercedes-Benz Shock Part Number: 210-320-04-30
$152.40 MSRP: $212.00You Save: $59.60 (29%)Ships in 1-2 Business DaysProduct Specifications- Replaced by: 210-323-49-00
Mercedes-Benz Shock Absorber Part Number: 247-320-05-04
$109.20 MSRP: $152.00You Save: $42.80 (29%)Ships in 1-2 Business DaysProduct Specifications- Other Name: Shock
- Replaces: 247-320-45-00

Mercedes-Benz Shock Absorber Part Number: 177-320-66-00
$148.80 MSRP: $208.00You Save: $59.20 (29%)Ships in 1-2 Business DaysProduct Specifications- Replaced by: 177-320-61-03
Mercedes-Benz Shock Absorber Part Number: 176-320-22-31-64
$123.60 MSRP: $172.00You Save: $48.40 (29%)Ships in 1-2 Business DaysProduct Specifications- Replaces: 176-320-22-31

Mercedes-Benz Shock Absorber Part Number: 202-320-06-31
$114.00 MSRP: $159.00You Save: $45.00 (29%)Ships in 1-2 Business DaysProduct Specifications- Replaced by: 202-326-27-00


Mercedes-Benz Shock Absorber Part Number: 242-320-09-31
$72.00 MSRP: $100.00You Save: $28.00 (28%)Product Specifications- Other Name: Shock
| Page 1 of 27 |Next >
1-20 of 537 Results
Mercedes-Benz Shock Absorber
Mercedes-Benz Shock Absorber levels out rough roads by converting each jolt into controlled hydraulic resistance that keeps the cabin calm in combination with sharp steering feel, longer tire life, and confident braking. Founded in 1926 in Germany, Mercedes-Benz combines a heritage of engineering and cutting-edge technology, the electric powertrains that capture energy when you're decelerating, the voice-guided MBUX infotainment suite that turns commands into action and the upcoming MB.OS software platform that brings driver assist, battery management, artificial intelligence and entertainment into one smart ecosystem. Stylish exterior lines are coupled with refined interiors so the brand is delivering vehicles that are modern looking and luxurious in feel while remaining connected on every journey. This forward-thinking culture also influences the suspension hardware applied to support the lineup. The second use of the term Shock Absorber emphasizes its role, which is universal across the range, which sits between wheel assemblies and the bodywork where twin-tube or mono-tube designs push oil through precise valves, dissipate heat quickly and work with the coil springs to limit oscillation within the chassis. Gas charging battles fluid foaming as damping remains uniform between long drives and spirited corners, and adaptive valve tuning allows the units to soften for small ripples but gain stiffness when forces are high, delivering a balance of comfort and control that aligns with the brand's overall commitment to intelligent mobility.
Genuine parts are built to last. These components go through tough factory testing, so you can trust they will hold up over time. At MBPartsGiant.com, finding Mercedes-Benz Shock Absorber is quick and simple. We keep a massive inventory in stock with low prices that are hard to beat. Just order online to get a real manufacturer's warranty with every single part. Returns won't be a headache either, thanks to our no-hassle policy. If you are in a rush, we provide expedited shipping to get your vehicle back on the road. Don't wait. Finish your repairs today and keep your Mercedes-Benz running like new. Explore the catalog now.
Mercedes-Benz Shock Absorber Parts and Q&A
- Q: How to check the front shock absorber and steering in the diesel engine on Mercedes-Benz 190E?A:To check the front suspension and steering, first raise the front of the vehicle and securely support it on axle stands. Visually inspect the balljoint dust covers and steering linkage gaiters for any splits, chafing, or deterioration, as wear can lead to lubricant loss and contamination, causing rapid deterioration of the balljoints. Ensure that the steering box mountings are tightened to the specified torque settings. For vehicles with power steering, examine the fluid hoses for chafing or deterioration, and check for fluid leaks at the pipe and hose unions, as well as under pressure from the steering box, which may indicate failed seals. Grasp the roadwheel at the 12 o'clock and 6 o'clock positions to check for free play; slight movement is normal, but significant movement requires further investigation. If rocking the wheel while an assistant depresses the footbrake eliminates or reduces movement, the hub bearings may be at fault; if not, there may be wear in the suspension joints or mountings. Next, grasp the wheel at the 9 o'clock and 3 o'clock positions to check for movement, which could indicate wear in the hub bearings or steering track-rod balljoints. Use a large screwdriver or flat bar to check for wear in the suspension mounting bushes, expecting some movement but looking for excessive wear. With the car on its wheels, have an assistant turn the steering wheel slightly back and forth; there should be minimal lost movement between the steering wheel and roadwheels. If there is excessive movement, inspect the linkage joints, mountings, steering column universal joint, and the steering box for wear. For the suspension strut and shock absorber, look for signs of fluid leakage around the body or from the rubber gaiter; any fluid indicates internal defects, necessitating renewal, and both struts or shock absorbers on the same axle should be replaced together to maintain handling and braking characteristics. The efficiency of the suspension strut or shock absorber can be assessed by bouncing the vehicle at each corner; it should return to its normal position without oscillation. Additionally, examine the upper and lower mountings for signs of wear.
- Q: How to check front CV Joint Boot and rear Shock Absorber on on Mercedes-Benz C230?A:Periodically check steering linkage and suspension components also: used or damaged parts can cause excessive tire wear, poor ride quality, handling problems and poor fuel economy. To test the shock absorbers, turn the engine off, apply parking brake on level ground and then measure the tire pressures. Press on one end of the vehicle, then release and ensure the vehicle does not move: It only takes 1 or 2 bounces back to its level position, any further it may be of low quality, the shock absorber is weak. Check the same at the opposite corners and then elevate the vehicle on jackstands. Check the presence or absence of fluid leakage in the shock absorbers making sure that any observed fluid leaks is due to shocks and in this case change the set. confirmation and damages Check secured mounting and if any is problematic then replace as a set. With steering and suspension, the components should be visually examined to be damaged, distorted, and leaking, especially where there are seals and boots. Wipe the lower knife-end of the steering joint and have jockey move up and down the steer with the assistant watching whether the joint is turning or not; anything turning shows it must be changed. You must hold all the tires on the front and test the play. Driveaxle boots play a significant role in shielding the constant velocity joints against dirt and damage; make sure they do not have any tears, cracks or loose clamps, any of which can indicate wear and leaking lubricant.


Related Mercedes-Benz Parts
 Mercedes-Benz Oil Filter Housing
 Mercedes-Benz Brake Booster
 Mercedes-Benz Exhaust Manifold
 Mercedes-Benz Fuel Pressure Regulator
 Mercedes-Benz ABS Relay
 Mercedes-Benz Air Bag Clockspring
 Mercedes-Benz Cooling Fan Shroud
 Mercedes-Benz Crankshaft
 Mercedes-Benz Headlight Screws
 Mercedes-Benz Rack & Pinion Bushing
 Mercedes-Benz Turbocharger Boost Solenoid
Browse by Model
190D Shock Absorber 190E Shock Absorber 260E Shock Absorber 300CD Shock Absorber 300CE Shock Absorber 300D Shock Absorber 300E Shock Absorber 300SD Shock Absorber 300SDL Shock Absorber 300SE Shock Absorber 300SEL Shock Absorber 300SL Shock Absorber 300TD Shock Absorber 300TE Shock Absorber 350SD Shock Absorber 350SDL Shock Absorber 380SE Shock Absorber 380SL Shock Absorber 400E Shock Absorber 400SE Shock Absorber 400SEL Shock Absorber 420SEL Shock Absorber 500E Shock Absorber 500SEC Shock Absorber 500SEL Shock Absorber 500SL Shock Absorber 560SEC Shock Absorber 560SEL Shock Absorber 560SL Shock Absorber 600SEC Shock Absorber 600SEL Shock Absorber 600SL Shock Absorber A220 Shock Absorber A35 AMG Shock Absorber AMG GT 43 Shock Absorber AMG GT 53 Shock Absorber AMG GT 63 S Shock Absorber AMG GT 63 Shock Absorber B Electric Drive Shock Absorber B250e Shock Absorber C220 Shock Absorber C230 Shock Absorber C240 Shock Absorber C250 Shock Absorber C280 Shock Absorber C300 Shock Absorber C32 AMG Shock Absorber C320 Shock Absorber C350 Shock Absorber C350e Shock Absorber C400 Shock Absorber C43 AMG Shock Absorber C450 AMG Shock Absorber C55 AMG Shock Absorber C63 AMG S Shock Absorber C63 AMG Shock Absorber CL500 Shock Absorber CL55 AMG Shock Absorber CL550 Shock Absorber CL600 Shock Absorber CL63 AMG Shock Absorber CL65 AMG Shock Absorber CLA250 Shock Absorber CLA35 AMG Shock Absorber CLA45 AMG Shock Absorber CLK320 Shock Absorber CLK350 Shock Absorber CLK430 Shock Absorber CLK500 Shock Absorber CLK55 AMG Shock Absorber CLK550 Shock Absorber CLK63 AMG Shock Absorber CLS400 Shock Absorber CLS450 Shock Absorber CLS500 Shock Absorber CLS53 AMG Shock Absorber CLS55 AMG Shock Absorber CLS550 Shock Absorber CLS63 AMG S Shock Absorber CLS63 AMG Shock Absorber E250 Shock Absorber E300 Shock Absorber E320 Shock Absorber E350 Shock Absorber E400 Shock Absorber E420 Shock Absorber E43 AMG Shock Absorber E430 Shock Absorber E450 Shock Absorber E500 Shock Absorber E53 AMG Shock Absorber E55 AMG Shock Absorber E550 Shock Absorber E63 AMG S Shock Absorber E63 AMG Shock Absorber EQB 250 Shock Absorber EQB 300 Shock Absorber EQB 350 Shock Absorber EQE 350 Shock Absorber EQE 350 SUV Shock Absorber EQE 350+ Shock Absorber EQE 350+ SUV Shock Absorber EQE 500 Shock Absorber EQE 500 SUV Shock Absorber EQE AMG Shock Absorber EQS 450 Shock Absorber EQS 450 SUV Shock Absorber EQS 450+ Shock Absorber EQS 450+ SUV Shock Absorber EQS 580 Shock Absorber EQS 580 SUV Shock Absorber EQS AMG Shock Absorber G500 Shock Absorber G55 AMG Shock Absorber G550 Shock Absorber G63 AMG Shock Absorber G65 AMG Shock Absorber GL320 Shock Absorber GL350 Shock Absorber GL450 Shock Absorber GL550 Shock Absorber GL63 AMG Shock Absorber GLA250 Shock Absorber GLA35 AMG Shock Absorber GLA45 AMG Shock Absorber GLB250 Shock Absorber GLB35 AMG Shock Absorber GLC300 Shock Absorber GLC350e Shock Absorber GLC43 AMG Shock Absorber GLC63 AMG S Shock Absorber GLC63 AMG Shock Absorber GLE300d Shock Absorber GLE350 Shock Absorber GLE400 Shock Absorber GLE43 AMG Shock Absorber GLE450 AMG Shock Absorber GLE450 Shock Absorber GLE53 AMG Shock Absorber GLE550e Shock Absorber GLE580 Shock Absorber GLE63 AMG S Shock Absorber GLE63 AMG Shock Absorber GLK250 Shock Absorber GLK350 Shock Absorber GLS350d Shock Absorber GLS450 Shock Absorber GLS550 Shock Absorber GLS580 Shock Absorber GLS63 AMG Shock Absorber Metris Shock Absorber ML250 Shock Absorber ML320 Shock Absorber ML350 Shock Absorber ML400 Shock Absorber ML430 Shock Absorber ML450 Shock Absorber ML500 Shock Absorber ML55 AMG Shock Absorber ML550 Shock Absorber ML63 AMG Shock Absorber R320 Shock Absorber R350 Shock Absorber R500 Shock Absorber R63 AMG Shock Absorber S320 Shock Absorber S350 Shock Absorber S400 Shock Absorber S420 Shock Absorber S430 Shock Absorber S500 Shock Absorber S55 AMG Shock Absorber S550 Shock Absorber S600 Shock Absorber S63 AMG Shock Absorber S65 AMG Shock Absorber SL320 Shock Absorber SL400 Shock Absorber SL450 Shock Absorber SL500 Shock Absorber SL55 AMG Shock Absorber SL550 Shock Absorber SL600 Shock Absorber SL63 AMG Shock Absorber SL65 AMG Shock Absorber SLC300 Shock Absorber SLC43 AMG Shock Absorber SLK230 Shock Absorber SLK250 Shock Absorber SLK280 Shock Absorber SLK300 Shock Absorber SLK32 AMG Shock Absorber SLK320 Shock Absorber SLK350 Shock Absorber SLK55 AMG Shock Absorber Sprinter 1500 Shock Absorber Sprinter 2500 Shock Absorber Sprinter 3500 Shock Absorber Sprinter 3500XD Shock Absorber