×
- Hello
- Login or Register
- Quick Links
- Live Chat
- Track Order
- Parts Availability
- RMA
- Help Center
- Contact Us
- Shop for
- Mercedes-Benz Parts
My Garage
My Account
Cart
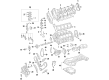
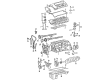
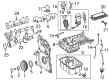
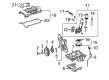
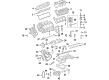
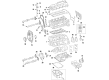
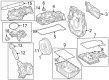
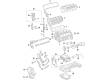
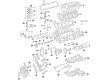
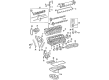
Genuine Mercedes-Benz Valve Cover
Cylinder Head Cover- Select Vehicle by Model
- Select Vehicle by VIN
Select Vehicle by Model
orMake
Model
Year
Select Vehicle by VIN
For the most accurate results, select vehicle by your VIN (Vehicle Identification Number).
67 Valve Covers found

Mercedes-Benz Front Cover Part Number: 272-015-01-01
$66.00 MSRP: $92.00You Save: $26.00 (29%)Ships in 1-2 Business DaysProduct Specifications- Other Name: Cover, Valve Cover
- Position: Passenger Side
- Replaced by: 272-015-06-01
Mercedes-Benz Front Cover Part Number: 272-015-02-01
$67.20 MSRP: $94.00You Save: $26.80 (29%)Ships in 1-2 Business DaysProduct Specifications- Other Name: Cover, Valve Cover
- Position: Driver Side
- Replaced by: 272-015-05-01

Mercedes-Benz Front Cover Part Number: 111-016-11-06
$142.80 MSRP: $199.00You Save: $56.20 (29%)Ships in 1-2 Business DaysProduct Specifications- Other Name: Cover; Valve Cover
- Position: Front

Mercedes-Benz Cylinder Cover Part Number: 642-016-26-24
$111.84 MSRP: $156.00You Save: $44.16 (29%)Product Specifications- Other Name: Cover
- Replaced by: 642-016-26-24-64
Mercedes-Benz Front Cover Part Number: 111-016-09-06
$97.20 MSRP: $135.00You Save: $37.80 (28%)Ships in 1-2 Business DaysProduct Specifications- Other Name: Cover; Valve Cover
- Position: Front
- Replaces: 111-016-04-06

Mercedes-Benz Valve Cover Part Number: 271-010-06-30
$174.00 MSRP: $242.00You Save: $68.00 (29%)Ships in 1-2 Business DaysProduct Specifications- Replaced by: 271-010-10-30

Mercedes-Benz Valve Cover Part Number: 112-010-04-30
$176.40 MSRP: $246.00You Save: $69.60 (29%)Ships in 1-2 Business DaysProduct Specifications- Other Name: Cylinder Head Cover
- Position: Passenger Side
- Replaces: 112-010-03-30

Mercedes-Benz Valve Cover Part Number: 112-010-05-30
$177.60 MSRP: $248.00You Save: $70.40 (29%)Ships in 1-2 Business DaysProduct Specifications- Other Name: Cylinder Head Cover
- Position: Driver Side
- Replaces: 112-010-02-30

Mercedes-Benz Valve Cover Part Number: 111-010-19-30
$390.00 MSRP: $545.00You Save: $155.00 (29%)Ships in 1-2 Business DaysProduct Specifications- Other Name: Cylinder Head Cover


Mercedes-Benz Valve Cover Part Number: 271-010-17-30
$219.60 MSRP: $306.00You Save: $86.40 (29%)Ships in 1-2 Business DaysProduct Specifications- Other Name: Cylinder Head Cover
Mercedes-Benz Valve Cover Part Number: 111-010-03-30
$332.40 MSRP: $462.00You Save: $129.60 (29%)Ships in 1-2 Business DaysProduct Specifications- Other Name: Cylinder Head Cover

Mercedes-Benz Valve Cover Part Number: 651-010-91-18
$249.20 MSRP: $348.00You Save: $98.80 (29%)Ships in 1-2 Business DaysProduct Specifications- Other Name: Cylinder Head Cover
- Replaces: 651-010-06-30

Mercedes-Benz Valve Cover Part Number: 654-016-93-00
$264.00 MSRP: $368.00You Save: $104.00 (29%)Ships in 1-2 Business DaysProduct Specifications- Other Name: Cylinder Head Cover
- Replaces: 654-016-45-00, 654-016-42-00, 654-016-52-00, 654-010-76-12, 654-010-28-02, 654-010-26-02-28, 654-010-26-02, 654-016-49-00

Mercedes-Benz Valve Cover Part Number: 156-016-20-05
$291.60 MSRP: $406.00You Save: $114.40 (29%)Ships in 1-2 Business DaysProduct Specifications- Other Name: Cylinder Head Cover
- Position: Passenger Side
- Replaces: 156-016-08-05

Mercedes-Benz Valve Cover Part Number: 113-010-00-30
$268.80 MSRP: $374.00You Save: $105.20 (29%)Ships in 1-2 Business DaysProduct Specifications- Other Name: Cylinder Head Cover
- Position: Driver Side
Mercedes-Benz Valve Cover Part Number: 156-016-19-05
$325.20 MSRP: $452.00You Save: $126.80 (29%)Ships in 1-2 Business DaysProduct Specifications- Other Name: Cylinder Head Cover
- Position: Driver Side
- Replaces: 156-016-02-05

Mercedes-Benz Valve Cover Part Number: 113-010-07-30
$342.00 MSRP: $476.00You Save: $134.00 (29%)Ships in 1-2 Business DaysProduct Specifications- Other Name: Gasket Kit
- Position: Driver Side

Mercedes-Benz Valve Cover Part Number: 113-010-04-30
$342.00 MSRP: $476.00You Save: $134.00 (29%)Ships in 1-2 Business DaysProduct Specifications- Other Name: Cylinder Head Cover
- Position: Passenger Side
- Replaces: 113-010-01-30
Mercedes-Benz Valve Cover Part Number: 111-010-13-30
Product Specifications- Other Name: Cylinder Head Cover
- Replaces: 111-010-08-30

Mercedes-Benz Valve Cover Part Number: 275-016-01-05
Product Specifications- Other Name: Cylinder Head Cover
- Position: Passenger Side
| Page 1 of 4 |Next >
1-20 of 67 Results
Mercedes-Benz Valve Cover
The Mercedes-Benz Valve Cover covers the top of the engine, sealing in the oil and keeping out dirt so that the valvetrain is quiet and long-lasting. Across the entire lineup, this component reveals how the brand combines precision engineering with day-to-day dependability, in a way that is reminiscent of vehicles that combine rakish design with cutting-edge digital comforts such as the intuitive MBUX system and the forward-looking MB.OS software that manages battery use, driver assist, and entertainment with ease. Efficient powertrains that capture braking energy, responsive handling that makes long trips relaxing, and cabins trimmed with quality materials are all part of why the company is a symbol of innovation and luxury since it was founded in 1926. Owners like the fact that each one is made to last and balances performance and sustainability without compromising comfort. Equally important, this cover is vital to that promise. Made from lightweight yet strong alloys or molded composites, it bolts to the cylinder head with a heat-resistant gasket that keeps the oil where it needs to be while providing ports for clean ventilation and quick refills. A healthy cover prevents leaks that may reach the hot surfaces, reduces unwanted emissions by channeling crankcase vapors through the proper channels, and maintains the smooth rhythm of the camshafts. Simple to check and cheap to replace, the Valve Cover is responsible for protecting every modern Mercedes-Benz engine and supporting the long service life drivers have come to expect.
Genuine parts are built to last. These components go through tough factory testing, so you can trust they will hold up over time. At MBPartsGiant.com, finding Mercedes-Benz Valve Cover is quick and simple. We keep a massive inventory in stock with low prices that are hard to beat. Just order online to get a real manufacturer's warranty with every single part. Returns won't be a headache either, thanks to our no-hassle policy. If you are in a rush, we provide expedited shipping to get your vehicle back on the road. Don't wait. Finish your repairs today and keep your Mercedes-Benz running like new. Explore the catalog now.
Mercedes-Benz Valve Cover Parts and Q&A
- Q: How to remove and refit of the valve cover in the Six-cylinder petrol engine on Mercedes-Benz 190E?A:Removal of the camshaft cover requires the disconnection of battery negative lead and lifting the bonnet completely first. Take out securing clips and remove the plastic cover on the top of the distributor cap. Gently draw out the HT leads to the spark plugs and label appropriately to fit back correctly. Lever the HT lead housing through the camshaft cover with an screwdriver, and place the lead housing aside, but do not further disconnect the leads. Disconnect the hose of the air cleaner assembly with camshaft cover breather and the small breather hose with the camshaft cover. Six of the securing bolts of the camshaft cover are now removed; get back the washers. Pop off the camshaft cover of the cylinder head (be careful not to scratch it). Recover the gasket. To refit: inspect the gasket and replace where necessary. Install the gasket in the recess of the camshaft cover, and then install the top and could on the cylinder head, being careful to place the gasket correctly, then industry the securing bolts after installing the cover on the cylinder head. Bolt slowly screw more until the tightening value is reached and reattach breather hoses, and attach HT lead housing. Reconnect the HT leads to the spark plugs and (where necessary) distributor cap with proper reconnection. Lastly, remove the plastic distributor cap cover and connect battery negative lead into place.
- Q: How to remove and install the Valve Cover in the V6 engines on Mercedes-Benz C230?A:The valve cover may be removed by first unplugging the cable in the negative terminal of the battery, after which the engine cover and air filter assembly are removed. Step two, loosen the ignition coils and label all the connectors and spark plug wires so that they can be reassembled easily. Unscrew the oil dipstick tube at the back end of the cylinder head on the right bank, and unscrew the PCV hoses out of each of the valve covers. In case there is a firm fuel line which is connected to the fuel rail, unwind it without losing sight of the warnings and fuel pressure relief steps. Removing the connectors and fasteners holding the engine harness assembly to the right valve cover and removing the camshaft cover at the front of each cylinder head/valve cover, tagging and un-connection of hoses and connectors as necessary, is required on 272 model engines (and later). Cut the mounting clamps in the back of the round centrifuge cover at the back of the left valve cover, then detach the center bolt and centrifuge be careful to prepare a rag in case the oil drips. The centrifuge-to-camshaft bolt is of an anti-clockwise thread. Then unscrew the bolts attaching the valve cover, keeping their positions in mind so they can be reattached in the same locations, and unscrew the valve cover, which may stick requiring a block of wood and a hammer to get it off. To install, the cylinder head and valve cover mating surfaces on both sides should be clean, and the rubber gaskets under reuse should not be damaged. On 272 type engines RTV sealant should be applied in the designated areas under the valve cover and employed to install the covers within 10 minutes of the sealant application. Wipe the mounting-bolt thread and thread holes. On 2005 and below models, hold the valve cover and valve gasket together and sequentially screw in and tighten the bolts to 200 inch max torque. Two-stage tightening procedure of the bolt should be followed in 2006 and subsequent models, the centrifuge is to be reinstalled on the right valve cover and the seal in the center of the centrifuge cover should be verified before re-installing. Last but not least, finalize the rest of the installation process in reverse sequence and begin engine cranking, inspecting thoroughly for oil spurts.


Related Mercedes-Benz Parts
 Mercedes-Benz Oil Dipstick
 Mercedes-Benz Wheel Hub
 Mercedes-Benz Shock Absorber
 Mercedes-Benz Throttle Position Sensor
 Mercedes-Benz A/C Clutch
 Mercedes-Benz Belt Tensioner Bolt
 Mercedes-Benz Distributor Cap
 Mercedes-Benz Ignition Coil Boot
 Mercedes-Benz Oil Dipstick Tube
 Mercedes-Benz Piston Ring
 Mercedes-Benz Sway Bar Bracket
 Mercedes-Benz Valve Spring
Browse by Model
190D Valve Cover 190E Valve Cover 260E Valve Cover 300CD Valve Cover 300CE Valve Cover 300D Valve Cover 300E Valve Cover 300SD Valve Cover 300SE Valve Cover 300SEL Valve Cover 300SL Valve Cover 300TD Valve Cover 300TE Valve Cover 400E Valve Cover 400SE Valve Cover 400SEL Valve Cover 500E Valve Cover 500SEC Valve Cover 500SEL Valve Cover 500SL Valve Cover 600SEC Valve Cover 600SEL Valve Cover 600SL Valve Cover AMG GT 43 Valve Cover AMG GT 53 Valve Cover C220 Valve Cover C230 Valve Cover C240 Valve Cover C250 Valve Cover C280 Valve Cover C300 Valve Cover C32 AMG Valve Cover C320 Valve Cover C350 Valve Cover C55 AMG Valve Cover C63 AMG Valve Cover CL500 Valve Cover CL55 AMG Valve Cover CL550 Valve Cover CL600 Valve Cover CL63 AMG Valve Cover CL65 AMG Valve Cover CLK320 Valve Cover CLK350 Valve Cover CLK430 Valve Cover CLK500 Valve Cover CLK55 AMG Valve Cover CLK550 Valve Cover CLK63 AMG Valve Cover CLS450 Valve Cover CLS500 Valve Cover CLS53 AMG Valve Cover CLS55 AMG Valve Cover CLS550 Valve Cover CLS63 AMG Valve Cover E250 Valve Cover E300 Valve Cover E320 Valve Cover E350 Valve Cover E420 Valve Cover E430 Valve Cover E450 Valve Cover E500 Valve Cover E53 AMG Valve Cover E55 AMG Valve Cover E550 Valve Cover E63 AMG Valve Cover G500 Valve Cover G55 AMG Valve Cover G550 Valve Cover G65 AMG Valve Cover GL450 Valve Cover GL550 Valve Cover GLC300 Valve Cover GLE300d Valve Cover GLE450 Valve Cover GLE53 AMG Valve Cover GLK250 Valve Cover GLK350 Valve Cover GLS450 Valve Cover ML250 Valve Cover ML320 Valve Cover ML350 Valve Cover ML430 Valve Cover ML450 Valve Cover ML500 Valve Cover ML55 AMG Valve Cover ML550 Valve Cover ML63 AMG Valve Cover R350 Valve Cover R500 Valve Cover R63 AMG Valve Cover S320 Valve Cover S350 Valve Cover S400 Valve Cover S420 Valve Cover S430 Valve Cover S500 Valve Cover S55 AMG Valve Cover S550 Valve Cover S580e Valve Cover S600 Valve Cover S63 AMG Valve Cover S65 AMG Valve Cover SL320 Valve Cover SL500 Valve Cover SL55 AMG Valve Cover SL550 Valve Cover SL600 Valve Cover SL63 AMG Valve Cover SL65 AMG Valve Cover SLK230 Valve Cover SLK250 Valve Cover SLK280 Valve Cover SLK300 Valve Cover SLK32 AMG Valve Cover SLK320 Valve Cover SLK350 Valve Cover SLK55 AMG Valve Cover Sprinter 2500 Valve Cover Sprinter 3500 Valve Cover Sprinter 3500XD Valve Cover